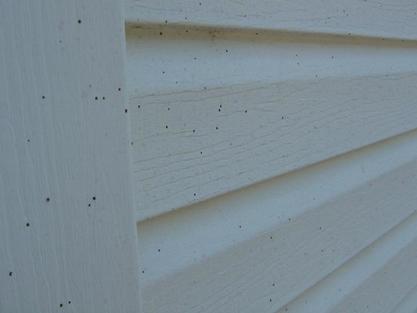
 If your siding, car, fence or any other surfaces around your house have broken out with a rash of black or dark-brown specks that do not want to come off, you are probably at war with something called Artillery fungus.
I have seen this on many homes over the years, but I have noticed a drastic increase in the number of homes that have been "shot"! The following picture is from a home that I just inspected, even the PVC plastic privacy fence had been shot! The artillery fungus, cannon fungus or shotgun fungus resembles a tiny cream or orange-brown cup with one black egg. The cup is approximately 1/10 of an inch in diameter. Areas of mulch with artillery fungi may appear matted and lighter in color than the surrounding mulch. The fruiting body of this fungus orients itself towards bright surfaces, such as light-colored houses or parked automobiles. The artillery fungus "shoots" its black, sticky spore mass which can be windblown as high as the second story of a house. After doing some research I think that I have discovered why we are seeing more homes with artillery fungus problems. It looks like the appearance of Artillery fungi has been associated with wood mulch (versus bark mulch) and the increased use of wood products in potting media. Mostly the use of ground-up wood pallets and unused pulp wood and the use of fallen trees from storms that have been ground into mulch . The best way to limit your exposure is the composting of these products prior to incorporation into media is encouraged to prompt the growth of beneficial antagonistic organisms. Better yet, use only the bagged or prepackaged mulch from a garden center. Bulk mulch (not in bags) tends to be more of a raw material that could contain spores. Also, the use of gravel mulch, stone, pea gravel, and black plastic next to buildings instead of using wood products will help reduce the problem. If wood products are used, the addition of about 3 cm of fresh mulch to cover old mulch each year may lessen the problem. Use of bark products, rather than wood products, may also lessen the fungal spread. One word of warning to homeowners wishing to replace house siding splattered by Artillery fungi --- insurance companies may not cover claims of damage due to "molds".  Ten Commandments Southern Style….
Some people have trouble with all those 'shall's' and 'shall not's' in the Ten Commandments.. Folks just aren't used to talking in those terms. So, in middle Tennessee they translated the 'King James' into ' Jackson County ' language.....no joke (It's posted on the wall at Cross Trails Church in Gainesboro , TN ). All of it ain't totally correct (but you get the picture). (1) Just one God (2) Put nothin' before God (3) Watch yer mouth (4) Git yourself to Sunday meetin' (5) Honor yer Ma & Pa (6) No killin' (7) No foolin' around with another fellow's gal (8) Don't take what ain't yers (9) No tellin' tales or gossipin' (10) Don't be hankerin' for yer buddy's stuff Now that's plain an' simple. Y'all have a nice day! 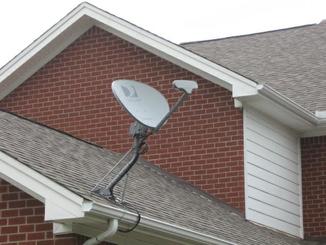 I know that just about everyone has seen those roof mounted satellite dishes for Direct TV. Have you ever wondered why they put them on the roof? Would you belive that is the easyest way to mount one! It is also 100% incorrect. Every single roofing manufacturer states that their products are not to be punctured in anyway, shape or form. They go on to say that if the shingle is punctured that it needs to be replaced.
Why do the manufacturers not want holes in their shingles? Could it be that holes tend to leak! The satellite dish installers could care less about your roof, their job is to install the dish as quick as they can and then move to the next victim. So the next time you see this type of roof mounted dish you will know that it is wrong! The owner of this home kept trying to tell me that it must be OK, because all of the other homes in the area have been done like this. I could not make him understand that Direct TV does not control what is right when it comes to roofing materials. I have also noted that many home inspectors are not reporting them either. I just finished reviewing three reports from home inspectors who did not note the roof mounted dishes. All three homes have had problems. Two of the homes have roof and wall damage from water leaks and the other had a section of the roof (along with the dish) torn off in a thunderstorm. The dish acted like a sail and as it was only screwed into the OSB decking, that section of the roof took off like a sailboard. 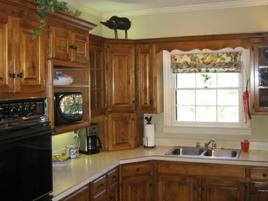 Well, if your kitchen cabinets are full of dishes like the ones in our home you might want to take a moment and check them after reading this short post. Just think about all of the weight that an average cabinet is hold when it is full of dinner plates, cups, saucers, mixing bowls and the like. It is simply amazing how much weight they can and should hold. But, have you ever given much thought as to what is holding those cabinets up on the walls? With prefabricated or factory built cabinets most are secured with screws (hardware) that is either provided by the manufacturer or it is specified in their installation manual. Most of the screws will have a torque head that requires a special driver bit that has a point that kind of looks like a star. The screw have specific places on the cabinets that they are to be inserted, they are structural points built into the cabinets to help support the weight. The key to placing the screws is to locate a wall stud that will hold them. Keep in mind that depending on your home they might be placed at 16" to 24" intervals in the walls. It is imperative that the screws are inserted into the wall studs and not the drywall. Many times an additional piece of lumber is placed on the wall, it is secured to the studs and then the cabinets are secured to that piece of lumber. Why do I bring this up? Well, this week while inspecting a nice home I discovered that the kitchen cabinets were literally falling off the walls! The contractor had screwed through the back of the cabinet, securing it to the wall. The problem was that the back of the cabinet was just a thin piece of panel like material that had not one thing to do with the structural strength of the cabinet. The thin back of the cabinets had detached from the wood boxes of the cabinets and the cabinets were falling forward. It was only a matter of time or an additional plate or glass before they fell!
OK, now it is time for the dreaded home inspection! First off, nobody should be dreading the home inspection, unless the house is really in poor condition. The list of items below will help the homeowner to prepare their home so that the inspector will be able to perform the inspection with ease. The last thing you want is for the home to be difficult for the inspector! Clean and neat homes for some reason tend to perform better when it come to a home inspection! Just saying........
Items the homeowner can repair or take care of before the home inspection:
Preparing the home for the day of the inspection:
You have been in your new home for almost a year. The clock is ticking on that one year builder warranty. At the one year anniversary you give up almost any chance you have in getting your builder to correct any issues you may have. Our Warranty Inspection is designed just for this purpose, so you can give your builder a written document that has all of the warranty issues known to date. Once your builder is put on notice about these problems the builder has no recourse but to correct or address the problems under state law, even if it goes beyond the twelve months. The key is putting them on notice with the report before the first year anniversary date of your new home.
All of the readily visible structural elements and major systems of the home. Items that will typically be included in an inspection are: · Framing (structure) This also includes the exterior cladding. · Roof and attic · Foundation (basements, slab foundations, crawl space, etc) · Grading of soil (drainage around the home) · Doors & windows · Garage & garage doors · Electrical system · Plumbing system · Heating and air conditioning systems · Insulation · Ventilation · Kitchen · Bathrooms · Appliances · Swimming pools & Spas; Lawn irrigation systems (additional fee required)
We will also tell you about any routine maintenance that should be performed, as well as answer any questions you may have. Our goal is to discover and inform you of anything we find that might affect your new home. Don't let the time run out on your warranty before you get everything corrected. You can schedule your Warranty Inspection anytime. An industry recommendation is to have one performed between the 9thto the 11th month of ownership. We even have folks that schedule a warranty inspection months in advance so that it will not be forgotten. If you have waited till the last few weeks, we can make adjustments to our schedule to fit you in before the end of the first year just give a call to see what we can do. If for some reason we can't adjust our schedule, we will refer you to another qualified ASHI inspector in the area who performs warranty inspection to our standards. I have included a summary in my report for the past 20+ years, or ever since I started inspecting homes.
Why do I include a summary? I guess the main reason is that if as a buyer I needed an inspection I would want to have a summary in my report. As a buyer I would want to know the high points or the problems that were found during the inspection without sifting through pages and pages of a report. I have always treated my clients like I would want to be treated, this could be why I have been successful in my business. I'm trying to make the process as easy as it can be for my client, lord only knows that their head is spinning in all directions during the home buying process. Some might argue that most folks will only read the summary. This is kind of like leading a horse to water! Once the report is out of my hands I have no control over it. But in my report I state in several areas, that the summary needs to be used with the entire report as this is the only way that you will get the entire picture of the conditions that were found. I tell my clients and their agents to use the summary as a road map to guide them through the report. What about pictures in the report? Hopefully your inspection report will include pictures of the findings and hopefully the pictures will be in the body of the report and not the summary. Why put the pictures in the body of the report and not the summary you might be asking? Well, by not having the pictures in the summary this helps to make the reader go into the report to see them. This is just another subtle way to reinforce the fact that one needs to also read the entire report and not just the summary. The inspection profession is divided on offering a summary. From what I have been able to tell about 70% of the profession offers a summary. This has shifted over the past several years. At one time very few inspectors provided a summary in their reports, now it is becoming the norm. With the hot summer weather we are experiencing in Middle Tennessee, we are looking to ways to keep our homes cool. I do not know about you but we have seen a sizable increase in our electric bill over last year and we have not made any change our home or to the temperatures in our home. Here are some tips to keep your home comfortable. Most are fairly inexpensive and make for an easy weekend project.
Window Coverings When the temperatures are expected to be high, consider keeping shades closed throughout the day. It is amazing the difference in heat gain when the sun is kept off the windows. In our home we have plantation blinds and I'm considering tinting the windows. Some of our neighbors have special screens on their windows that keep the solar gain to a minimum. Fans Around the Home Consider installing ceiling fans to keep the air moving, this helps make it much more comfortable, especially in bedrooms. In my home, I have several small fans that keep the air circulating. The movement of air makes you feel cooler than the actual air temperature. Fans for the Season I have a digital indoor and outdoor thermometer that I use to determine when the outside temperature has dropped below the inside temperature. During the cooler times of the year and when the temperature outside drops in the evening, we have a large box fan that is tightly fitted in a back window that exhausts the warmer interior air outside. This causes negative air pressure in the house, and when you open other windows in the home, you will get a nice cool breeze coming in. Similar to those old fashion whole house fans that use to be so popular.. Home Air Conditioners If you have a central air conditioner, there are a few items you should consider to keep it running at peak efficiency. The outside component of your unit is called the compressor. It houses the pump and the blower that cool the compressed gas that is then pumped into the home to cool the air inside. We see these units covered with landscaping debris (grass, weeds, bushes etc.) all the time. When this happens the airflow is restricted and it has to work harder to cool your home. Always keep these units clear from obstructions, so they can easily cool the coils. Keep lawn clippings from blowing on them when trimming the grass. Sometimes dryer vents are located too close to AC units, plugging them with lint. Read your manual on the best way to clean the unit. Some may be hosed off, ALWAYS TURN OFF THE POWER when cleaning them. Others require more complex cleaning. A dirty AC will waste a lot of energy. When in doubt have a professional clean it regularly, usually at least once a year. Attic Fans These will help keep he attic spaces cool. Ideally the attic is the same temperature as the outside air. In the summer, I routinely enter attics that are as high at 145 degrees! Ventilation and insulation are both critical to keep this heat away from your living space. If your attic has less then 12 inches of insulation consider having more added. This will pay for itself in heating in winter and keep you much more comfortable in summer. Roofing When re-roofing a home, consider using light colored coverings. They will reduce the heat from the sun. We always recommend silver coating un-coated torch down roofs. It will extend their life and help cool your home. Another saver are the addition of "Ridge Vents" on the roof. This is one of the most effective ways of venting an attic. Thermostats Use automatic thermostats with timers to control your cooling system. Be sure your air filters are clean, and your ductwork is tight, well insulated and free from leaks. We see leaking ductwork every day! Never turn you thermostat higher than 2-3 degrees than you normally keep it set at. It takes more energy to cool down a home than to maintain the temperature in the home. I use and really love the Nest Thermostat, it is a smart thermostat that allows for the tracking of your energy usage. Landscaping We recommend that you plant trees that will drop their leaves in winter on the south and west side of homes. This way you have shade in summer and the sun can naturally heat the home in winter. Remember to keep all plants trimmed away from the building. "To increase the efficiency of your air-conditioning unit by up to 10 percent, plant trees and shrubs to shade the outside unit; place them at least 30 inches away so they don't block the vents on the compressor. For more tips on ways to use landscaping to increase the energy efficiency of your home, see the Department of Energy's landscaping advice." Consumer Reports |
AuthorScott Patterson has been a professional home inspector since 1995. Scott works out of the Greater Nashville TN area. Contact his team at Trace Inspections for all of your inspection needs. 
Archives
September 2023
|

 RSS Feed