 I'm sure most of us deal with wasp on many of our inspections. It is only April and I have gone through about 4 cans of wasp spray already. Either I'm inspecting a bunch of homes with wasp or the wasps are just bad this year.
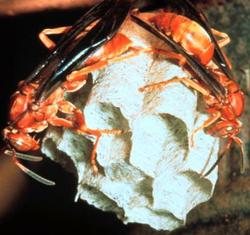
Last week, I had an inspection and I did not see the wasp nest above the back door. Unfortunately for me the wasp were a little more observant and I was stung on my arm. It hit so hard that it left a little blood. Luckily I really don't have much of a reaction to them, but you just never know. Down here in the south we deal mostly with what I have nicked named "Nuclear Wasp"! The Red or Mahogany wasps pack quite a wallop when they sting. They are also very aggressive and will attack many feet from their nest. This is a close up picture of a Red Wasp nest that I found a while back at a home. Anyway, just be sure that you have that wasp spray in your tool bag. You never know when you will need it. I really like the one that shoots out like foam. It stick to everything it hits. OK, now it is time for the dreaded home inspection! First off, nobody should be dreading the home inspection, unless the house is really in poor condition. The list of items below will help the homeowner to prepare their home so that the inspector will be able to perform the inspection with ease. The last thing you want is for the home to be difficult for the inspector! Clean and neat homes for some reason tend to perform better when it come to a home inspection! Just saying........
Items the homeowner can repair or take care of before the home inspection: □ Prune vegetation away from the house. □ Clean the gutters. □ Replace or clean dirty furnace/HVAC filters. □ Repair leaking faucets. □ Install missing covers on electrical switches, outlets and junction boxes. □ Replace all smoke alarms installed before January 1, 2002 to comply with current standards. Replace batteries in all detectors! □ Replace burned out light bulbs. □ Pull soil 6" away from the siding, basement windows, foundation vents and decks. □ Install 6-8mil. black plastic vapor barrier in the crawlspace over exposed soil. □ Make sure that the water heater is raised 18" or more if it is the garage or storage room. Preparing the home for the day of the inspection: •· Remove any belongings that block access to the furnace, water heater, electrical panel, attic and crawl spaces so the inspector may remove cover panels in these areas. •· Verify that gas, water and electricity are on, even in vacant homes. •· All gas pilot lights should be lit. The inspector will not light any pilot and will note that item as not working. •· Make sure that all appliances normally operated by the homeowner can be tested as needed. Clean and pick up the home so that it is easy for the inspector to get around. The inspector will not move dirty laundry to look at an item! 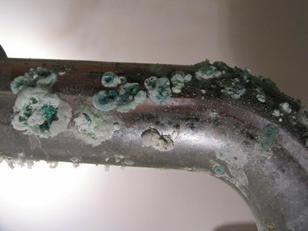 The other day I found a section of old chrome plumbing pipe in full bloom under a homes bathroom sink. It really was a pretty sight to behold. The blooms were bluish green and were caused by corrosion of the pipe and chemicals that had been used to "clean" the drains.
This is fairly common with metal drain lines, traps, etc. What is uncommon is that you seldom find a pipe like this in full bloom! Most of the time when they get to this stage of bloom they are leaking like a sieve and the section has been replaced. So if you have metal drain pipes take a look and see if you have a bumper crop of blooms. If you find a pipe that has even the smallest amount of corrosion or discoloration, go ahead and replace that section of pipe. The damage starts from the inside of the pipe and it might not be leaking now but it will be soon, it is only a matter of time. Oh, and a word to the wise! Do not pick the blooms! If you do you will need a bucket to catch the water that will flow from the vase that was holding that pretty flower!! I know that just about everyone has heard about companies that clean the air ducts in homes. The typical way to clean the air ducts is to place a round bristle brush about the same inside diameter as the pipe. It is either pushed or pulled through the pipe. Many times it also has a vacuum suction as part of the brush. Then after they have cleaned the duct they come back and spray various anti-bacterial and anti-fungal chemicals to aid in the cleaning of the ducts. Is it a good idea or is it a bad idea to clean your air ducts? It depends on what the air ducts are made of! If you have the strong sheet metal air ducts, then it might be a good idea to have a qualified company clean them. The key is a quality company that knows what they are doing! But, if you have those flexible plastic air ducts that are in the majority of the homes that have been built in the past eight or so years then you might want to rethink having them cleaned. The flex-duct type plastic air ducting is like a sandwich. it is comprised of an inner layer of plastic like sheeting then a layer of fiberglass insulation and then an exterior layer of plastic. Most of the time the inner layer has a wire that is built into it so that the duct will have additional strength and flexibility to help keep the duct from crushing and closing up. This wire also gives the air duct a fan or accordion shape, that traps dirt and dust. The plastic flex- duct can not effectively be cleaned. Most of the time if cleaning is attempted the flex-duct will be damaged We also have fiberglass fiberboard air ducts. This type of air duct can not be cleaned either. The fiberboard has a protective covering that is easily damaged. We really do not want fiberglass particles floating around in the air we are breathing every day! This is a picture of a damaged duct as see from a floor register on a new construction home that I inspected. This is the result of an air duct cleaning company cleaning the construction debris out of the air supply ducts. The pink is the fiberglass insulation part of the flex-duct: 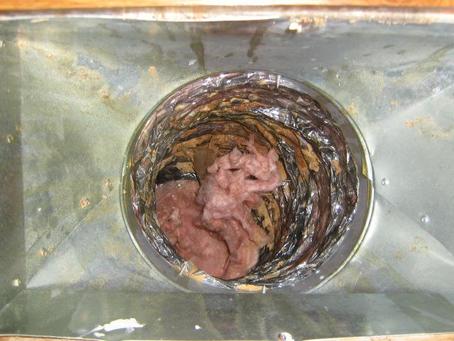 So, if you have metal air ducts you can clean them. If you have flexible type of fiberboard air ducts you should not clean them. This type of air duct needs to be replaced and not cleaned.
This is the history of the GFCI in homes. It does not mean that GFCI protected outlets are not needed if a home was built before the effective date. You can't grandfather safety!
1971 Receptacles within 15 feet of pool walls 1971 All equipment used with storable swimming pools 1973 All outdoor receptacles 1974 Construction Sites 1975 Bathrooms, 120-volt pool lights, and fountain equipment 1978 Garages, spas, and hydromassage tubs 1978 Outdoor receptacles above 6ft.6in. grade access exempted 1984 Replacement of non-grounding receptacles with no grounding conductor 1984 Pool cover motors 1984 Distance of GFCI protection extended to 20 feet from pool walls 1987 Unfinished basements 1987 Kitchen countertop receptacles within 6 feet of sink 1987 Boathouses 1990 Crawlspaces (with exception for sump pumps or other dedicated equip.) 1993 Wet bar countertops within 6 feet of sink 1993 Any receptacle replaced in an area presently requiring GFCI 1996 All kitchen counters - not just those within 6 feet of sink 1996 All exterior receptacles except dedicated de-icing tape receptacle 1996 Unfinished accessory buildings at or below grade 1999 Exemption for dedicated equipment in crawlspace removed INGREDIENTS
• 1 tablespoon butter or EVO • 1/2 cup chopped green onions • 1/2 teaspoon garlic powder • 1/2 teaspoon of fresh grated nutmeg • 1 (4 ounce) can diced green chilies • 1 (10.75 ounce) can condensed cream of chicken soup • 1/2 cup sour cream • 1 1/2 cups cubed cooked chicken breast meat • 2 cups shredded Mexican style cheese, divided • 6 (12 inch) flour tortillas • 1/4 cup milk DIRECTIONS Cooking the chicken with additional ingredients: I like to use breast meat off the bone. Before I cook the chicken I slice it into small cubes, I season it and let it sit for about an hour or longer in the refrigerator. Season the chicken with 4 cloves crushed garlic, ½ tsp. turmeric, 2 tsp of sea salt and about a ¼ cup of chopped fresh cilantro. Mix the seasonings in a gallon zip-loc bag and pour about a ½ of olive oil into the bag. Mix well and then add the chicken and return to the refrigerator. If you can let it sit over night it is fantastic, but just an hour or two will work!. Preheat oven to 350 degrees F (175 degrees C). Lightly grease a large baking dish. In a medium saucepan over medium heat, melt the butter/EVO and sauté the green onion until tender (about 3 to 4 minutes). Add the garlic powder, nutmeg, then stir in the green chilies, cream of chicken soup and sour cream. Mix well. Reserve 3/4 of this sauce and set aside. To the remaining 1/4 of the sauce in the saucepan, add the chicken and half of the shredded r cheese. Stir together. Fill each flour tortilla (about 10) with the chicken mixture and roll up. Place seam side down in the prepared baking dish. In a small bowl combine the reserved 3/4 of the sauce with the milk. Spoon this mixture over the rolled tortillas and top with the remaining shredded cheese. Bake in the preheated oven for 30 to 35 minutes, or until cheese is bubbly. Well I had a first today!
As usual I arrived about 20 minutes before my client or their agent. As the house was vacant I was alone, so I started to get some of the "Grunt" work done. This house was right at 125 years old with a stone foundation and a basement. I found an access door, similar to a crawlspace hatch on the side of the house. What I did not realize at first was that this was an old coal shoot that went down to the basement. I also did not realize was how steep and slick it was. I slid about six feet down to the dirt basement floor, it took only one attempt to realize that my petite 6'1" 260lb body was not going to make it back up! I was stuck in the basement! The basement had stairs that went up to the house but the door was locked from the inside of the home. So I proceeded to get my cell phone out of my pocket, and low and behold I had left it in my truck! OK, it is getting past funny now...... About 15 minutes later I hear a car drive up, it was my client! He heard me calling out the coal shoot and came to the entrance. After he stopped laughing, he called his agent. She said that she was just leaving Panera from eating lunch and she would be a little late!!! TYPICAL I was thinking! Anyway about thirty minutes later she pulls up and I'm out of the basement in short order. The only good thing to come out of this episode was one of the best basement inspections I have ever done! So how is your day going! 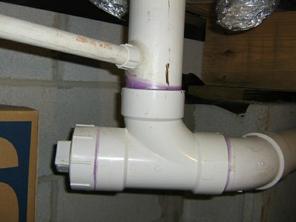 Did you know that one of the most common problems that home inspectors find is the direct connection of the Air Conditioning condensation line to the homes sewer system! Yuck!
I can't tell you how many times I have seen air conditioning condensate being emptied directly into the homes waste plumbing line. Outside of this being against building codes (both common sense and written) it is also unhealthy. What most folks do not realize is that the condensation drain line is connected directly to the evaporator coil cabinet and that it is under negative pressure. That means that it can actually suck air into the system and then into the living area. This is one of the reasons that the manufacturers require an air gap of trap on the line shortly after it leaves the cabinet. The air gap or trap works until it goes dry, this happens during the winter months when the A/C is not used. The water dries up and the systems starts sucking in air. If it is connected to the sewer line it will suck all types of little nasty's into the air that you are breathing. Legionnaire disease can start this way! So can you see the direction we are heading and why it is not a good idea to connect a condensation drain line to a homes waste plumbing lines! If the condensation line is connected to the homes sewer system it can draw sewer gas and bacteria into the homes HVAC system and into the living are of the home. It can drain indirectly to the homes waste plumbing system or it can drain to the exterior of the home, it just can not be connected directly to the homes waste plumbing and this would include the homes vent stacks or pipes. I found this condensation line connected directly to a 4" waste line, a toilet was sitting directly above and on the top of the pipe! The HVAC contractor did this and really caused a problem. In order for this to be properly repaired the 4" section of pipe will need to be replaced, you can't patch or plug the hole that was made for the condensation line. 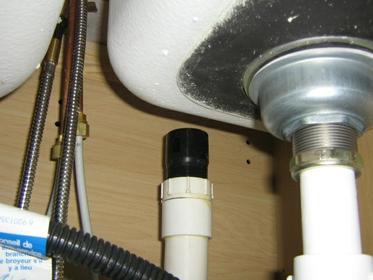 What is that thing under my sink?
All homes have sinks, many kitchen and wetbar sinks are equipped with a small valve that is attached to a pipe on the drain line under the counter. The purpose of this valve is to allow air to enter, but not to escape the plumbing waste line. Without this equalization of the air pressure in the line the water will not drain properly out of the sink. Think of a soda bottle that is full of water. You turn the bottle upside down and the water has a hard time getting out; but if you tilt the bottle to allow air to enter then the water flows freely. The same principle applies to the waste plumbing system in your home. Air must enter for everything to flow properly. Now for the problem! Well, it's not really a major problem but it could cost you a plumbers service call and about $40 worth of repairs. The problem arises when builders or plumbers install what is called a Mechanical Vent in place of an Air Admittance Valve or AAV. Why do you ask? The cost! A Mechanical Vent cost less than $10 and the AAV will cost around $40-$50. Mechanical vents are not allowed in residential homes, only the AAV should be used. Note: The Mechanical Vent is only allowed in manufactured homes, aka, Doublewides! Both will do the same job of allowing air to enter the plumbing system, but the difference is that when the Mechanical Vent fails it fails in the open position. This will then allow sewer gas to enter the home. When the AAV fails it does so in the closed position so all that you have is a sink that will not drain very well. They will last on the average about 7-10 years under normal use before they need replacing. If you have a home with a sewage odor that you can't find the source, this could be the culprit. The Mechanical Vent is easy to identify. It will be made from black plastic and has two or three rectangle openings on its side and you can see the spring. The AAV will be made from white to tan plastic with no spring large openings. The picture at the top of this page is a mechanical vent. The repair! You just simply replace the Mechanical Vent with an AAV! They screw into the same fitting. It is a very simple repair but as with all plumbing repairs it is always best to call a plumber, just in case! So look under those sinks and see what you have. If you see a black top on a pipe chances are that you have a Mechanical Vent. I have been asked a couple of time what are the "Red Flags" that trigger an insurance company to look at a home with the intent of dropping or not ever covering a home, or a mortgage not being issued. This can be a serious problem when a person is trying to buy a home, or they have already bought it and then they are dropped. Many insurers and lenders will not even entertain covering a home that is over 30-40 years of age without an inspection of the major systems. They call them 4-Point inspections.
Over the years I have seen the following electrical items cause problems with obtaining insurance or a mortgage:
I have also seen the following items causing problems with coverage:
|
AuthorScott Patterson has been a professional home inspector since 1995. Scott works out of the Greater Nashville TN area. Contact his team at Trace Inspections for all of your inspection needs. 
Archives
September 2023
|
 RSS Feed