|
The home inspector profession is divided into a couple of groups when it comes down to mold testing. You have the group of inspectors who do not test for mold. This group tends to be comprised of the more experienced or seasoned group of inspectors; they do not really offer or sell ancillary services to increase their sales. They use their knowledge and experience to locate the source of moisture that might be supporting mold and then they move on to the next problem. The logic that this group uses is; if you see mold, smell mold then you have mold! Why test for it when you know you have it! 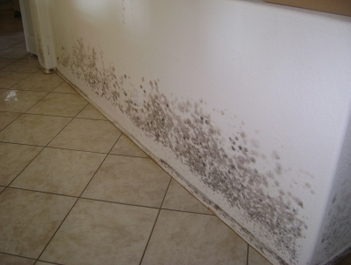 The other group from my experience tend to be the newer inspectors or lets say those with less than five or so years in the profession, they are still building their referral base. They are trying to sell everything under the sun to help supplement their inspection business. Many in this group have attended a one or two-day class on mold sampling and that is about the extent of their knowledge on the subject. The same testing labs that are selling the service to the home inspectors perform much of this training and the so-called “certifications”! Talk about being self-serving and a conflict of interest! With this group, they test for mold and then when the results come back from the lab in a week or so they hand their client the lab report. The report tells their client that they have ABC or XYZ spores in X concentration and that is about the extent of the report. Yes, some do tend to provide a little more information than others, but when it is all said and done with they really don't offer much more than everyone already knew in the first place and that was that the home had mold. The exception in the second group would be those that have the proper training and skill sets to write an abatement plan for a mold damaged structure, but these folks are not easy to come by and tend to work for the environmental consulting firms. They have advanced training and many have specialized degrees or certifications from accredited schools. Just handing a client a "Mold Report" does nothing for anyone, a true abatement plan is needed. The abatement plan is what the mold abatement contractor goes by to clean the structure. It is the road map so to speak of how and what needs to be done. The EPA has a great pamphlet that tells consumers what they need to do when they find mold. It is full of common sense and not hyperbole. http://www.epa.gov/mold/pdfs/moldguide.pdf 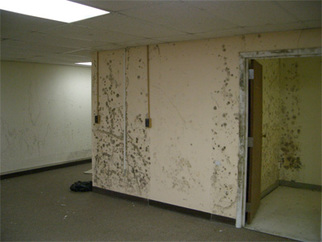 I can't even begin to tell you how many times I have been asked what is a "Rake" on a roof or what is the "Valley". Sometimes I forget that what is common terminology for me might be like Greek to the person I'm talking with. When I'm talking about the rake on the West side or whatever side of the roof some folks get the strangest look on their face, some are thinking that I'm talking about a common yard rake. I hope this diagram helps with some of the terminology that you might find in a home inspection report. 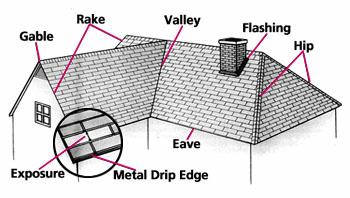 This casserole is made with a whole chicken, onion, carrots, celery, rice, and almonds, along with other ingredients. It is fairly simple, but it does take a little time as you must cook the chicken first and then assemble the remaining ingredients and bake. It is well worth the extra time!
INGREDIENTS:
PREPARATION: In a large kettle or Dutch oven, combine chicken, water, onion, carrot, celery, salt, and bay leaf. Cover and simmer for 1 1/2 hours, or until tender. Cool chicken in the stock; remove from stock. Remove skin and take meat from bones; cut into bite-size pieces and place in a medium bowl. Pour about 1/2 cup of stock over the chicken; cover and refrigerate. Strain remaining stock into a bowl; chill. Skim fat off the strained chilled stock; save for the sauce. Heat 1 cup of stock; pour over cooked rice in a bowl; let stand while making sauce. Melt chicken fat or part chicken fat and part butter in a saucepan over medium low heat. Blend in flour until smooth and bubbly, you are making a Ruex. Stir in 2 cups of strained stock. Cook sauce over low heat, stirring constantly, until sauce thickens; let boil 1 minute. Gradually stir cream; remove from heat. Stir in mushrooms with mushroom liquid, pimiento, and almonds. In a buttered 12 cup casserole dish, alternate layers of chicken with sauce and the rice-broth mixture. Sprinkle buttered bread crumbs over top. Bake at 350° for 45 to 55 minutes, or until sauce is bubbly and crumbs are nicely browned. Scott Patterson, Spring Hill, TN. Well, I must say that this was a total surprise. It was a great country home that had a wonderful view overlooking a typical middle Tennessee valley. The only problem is that the former owners did not disclose that their heard of cats had used every single room in the home as their own personal litter box! When the new owner viewed the home, new carpets and laminate floor had just been installed over the past few days. The former cat herdsman owner had plug-in room air fresheners in every room, along with some reed diffusers and a couple of Old Yankee jar candles burning. The new owner said it smelled like a big basket of wild flowers! I did not do the original inspection but I can imagine the way the home smelled with plug-in air fresheners all over the home. About 7 weeks later the new owner takes ownership and is camping out in the home on an air mattress. He was moving the family as soon as school was out, he was in the home alone. While sleeping close to the floor he noticed that it smelled like an old wet dipper!. He proceeded to pull a corner of the carpet up and he found why the home had new carpet in it. The following photos are of what the new owner found! If you have a weak stomach, you might want to skip the photos…. 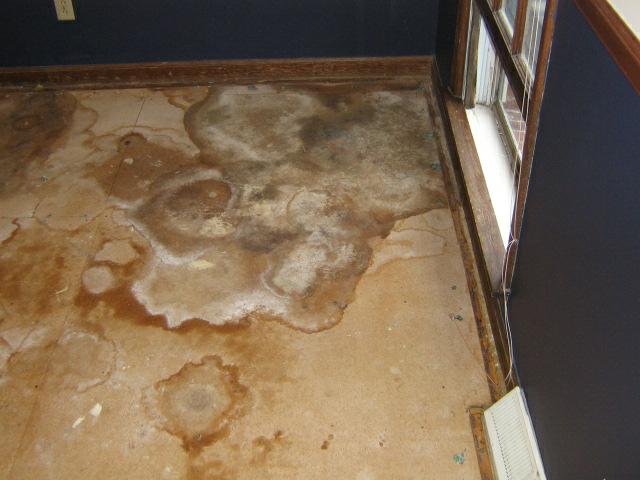  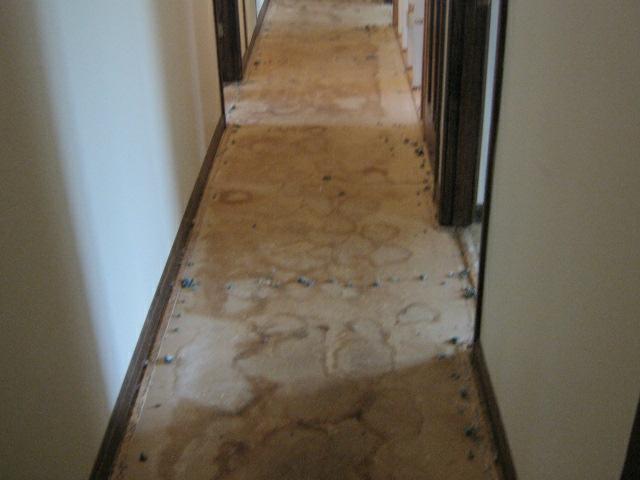 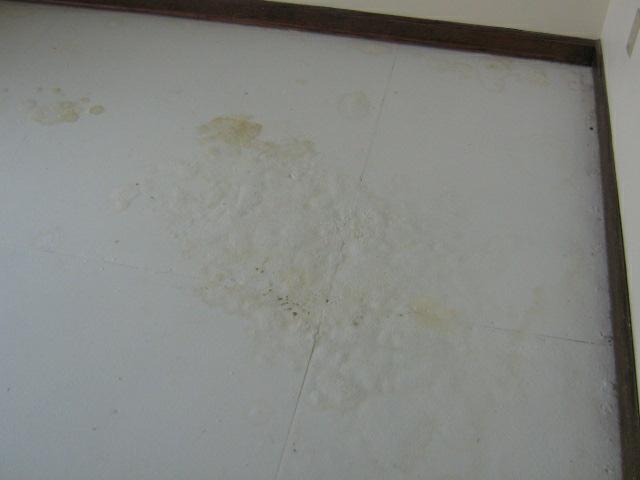 The last picture shows the floor in the dining room. It had been painted by the former owner with KILZ in an attempt to cover the cat urine. The problem with that is that urine is Hygroscopic, the salts in the urine attract moisture (humidity) and this then reconstitutes the urine. This is why you can't get rid of the odor! The only cure for this home is to have all of the sub-flooring replaced. Yes, I'm sure it will not be a simple matter and it will get nasty down the road with all of that legal stuff.
American Society of Home Inspectors® (ASHI®) Client Bill of Rights  As a profession, home inspectors have an ethical obligation to the public. This obligation includes integrity, competency, honesty, confidentiality, objectivity and an interest in public safety. Fulfilling this obligation will promote and preserve public confidence in the profession. In recognition of this obligation, we hereby promote and proclaim these rights for our clients. I. To be assured the inspector is objective in his or her reporting and will not knowingly understate or overstate the significance of reported conditions. II. To be assured the inspector's opinion is based on genuine conviction within the scope of his or her education and experience. III. To be assured the inspector stays current with the industry's body of knowledge through continuing education. IV. To be assured the inspector will not disclose inspection results or client information without client approval. V. To be assured the inspector has not accepted any form of compensation for recommending contractors, services or products. VI. To be assured the inspector will not offer to repair or replace for compensation any component covered by the ASHI Standards of Practice for one year after the inspection. VII. To be assured future referrals to the inspector from real estate agents are not dependent on the inspection findings or the sale of the property. VIII. To be assured the home inspector has no financial interest in the transaction. IX. To be assured the inspector is not receiving compensation for the inspection from any other party. X. To be assured the inspector did not compensate the real estate agent or other party for the referral to the client. 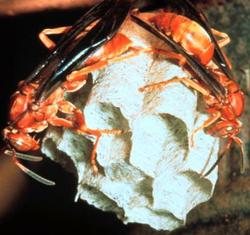 I'm sure most of us deal with wasp on many of our inspections. It is only April and I have gone through about 4 cans of wasp spray already. Either I'm inspecting a bunch of homes with wasp or the wasps are just bad this year.
Last week, I had an inspection and I did not see the wasp nest above the back door. Unfortunately for me the wasp were a little more observant and I was stung on my arm. It hit so hard that it left a little blood. Luckily I really don't have much of a reaction to them, but you just never know. Down here in the south we deal mostly with what I have nicked named "Nuclear Wasp"! The Red or Mahogany wasps pack quite a wallop when they sting. They are also very aggressive and will attack many feet from their nest. This is a close up picture of a Red Wasp nest that I found a while back at a home. Anyway, just be sure that you have that wasp spray in your tool bag. You never know when you will need it. I really like the one that shoots out like foam. It stick to everything it hits. OK, now it is time for the dreaded home inspection! First off, nobody should be dreading the home inspection, unless the house is really in poor condition. The list of items below will help the homeowner to prepare their home so that the inspector will be able to perform the inspection with ease. The last thing you want is for the home to be difficult for the inspector! Clean and neat homes for some reason tend to perform better when it come to a home inspection! Just saying........
Items the homeowner can repair or take care of before the home inspection: □ Prune vegetation away from the house. □ Clean the gutters. □ Replace or clean dirty furnace/HVAC filters. □ Repair leaking faucets. □ Install missing covers on electrical switches, outlets and junction boxes. □ Replace all smoke alarms installed before January 1, 2002 to comply with current standards. Replace batteries in all detectors! □ Replace burned out light bulbs. □ Pull soil 6" away from the siding, basement windows, foundation vents and decks. □ Install 6-8mil. black plastic vapor barrier in the crawlspace over exposed soil. □ Make sure that the water heater is raised 18" or more if it is the garage or storage room. Preparing the home for the day of the inspection: •· Remove any belongings that block access to the furnace, water heater, electrical panel, attic and crawl spaces so the inspector may remove cover panels in these areas. •· Verify that gas, water and electricity are on, even in vacant homes. •· All gas pilot lights should be lit. The inspector will not light any pilot and will note that item as not working. •· Make sure that all appliances normally operated by the homeowner can be tested as needed. Clean and pick up the home so that it is easy for the inspector to get around. The inspector will not move dirty laundry to look at an item! 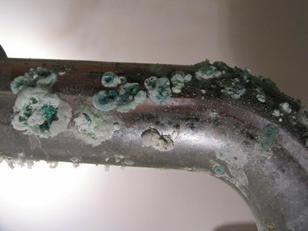 The other day I found a section of old chrome plumbing pipe in full bloom under a homes bathroom sink. It really was a pretty sight to behold. The blooms were bluish green and were caused by corrosion of the pipe and chemicals that had been used to "clean" the drains.
This is fairly common with metal drain lines, traps, etc. What is uncommon is that you seldom find a pipe like this in full bloom! Most of the time when they get to this stage of bloom they are leaking like a sieve and the section has been replaced. So if you have metal drain pipes take a look and see if you have a bumper crop of blooms. If you find a pipe that has even the smallest amount of corrosion or discoloration, go ahead and replace that section of pipe. The damage starts from the inside of the pipe and it might not be leaking now but it will be soon, it is only a matter of time. Oh, and a word to the wise! Do not pick the blooms! If you do you will need a bucket to catch the water that will flow from the vase that was holding that pretty flower!! I know that just about everyone has heard about companies that clean the air ducts in homes. The typical way to clean the air ducts is to place a round bristle brush about the same inside diameter as the pipe. It is either pushed or pulled through the pipe. Many times it also has a vacuum suction as part of the brush. Then after they have cleaned the duct they come back and spray various anti-bacterial and anti-fungal chemicals to aid in the cleaning of the ducts. Is it a good idea or is it a bad idea to clean your air ducts? It depends on what the air ducts are made of! If you have the strong sheet metal air ducts, then it might be a good idea to have a qualified company clean them. The key is a quality company that knows what they are doing! But, if you have those flexible plastic air ducts that are in the majority of the homes that have been built in the past eight or so years then you might want to rethink having them cleaned. The flex-duct type plastic air ducting is like a sandwich. it is comprised of an inner layer of plastic like sheeting then a layer of fiberglass insulation and then an exterior layer of plastic. Most of the time the inner layer has a wire that is built into it so that the duct will have additional strength and flexibility to help keep the duct from crushing and closing up. This wire also gives the air duct a fan or accordion shape, that traps dirt and dust. The plastic flex- duct can not effectively be cleaned. Most of the time if cleaning is attempted the flex-duct will be damaged We also have fiberglass fiberboard air ducts. This type of air duct can not be cleaned either. The fiberboard has a protective covering that is easily damaged. We really do not want fiberglass particles floating around in the air we are breathing every day! This is a picture of a damaged duct as see from a floor register on a new construction home that I inspected. This is the result of an air duct cleaning company cleaning the construction debris out of the air supply ducts. The pink is the fiberglass insulation part of the flex-duct: 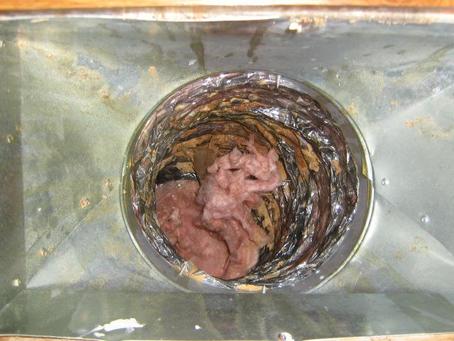 So, if you have metal air ducts you can clean them. If you have flexible type of fiberboard air ducts you should not clean them. This type of air duct needs to be replaced and not cleaned.
This is the history of the GFCI in homes. It does not mean that GFCI protected outlets are not needed if a home was built before the effective date. You can't grandfather safety!
1971 Receptacles within 15 feet of pool walls 1971 All equipment used with storable swimming pools 1973 All outdoor receptacles 1974 Construction Sites 1975 Bathrooms, 120-volt pool lights, and fountain equipment 1978 Garages, spas, and hydromassage tubs 1978 Outdoor receptacles above 6ft.6in. grade access exempted 1984 Replacement of non-grounding receptacles with no grounding conductor 1984 Pool cover motors 1984 Distance of GFCI protection extended to 20 feet from pool walls 1987 Unfinished basements 1987 Kitchen countertop receptacles within 6 feet of sink 1987 Boathouses 1990 Crawlspaces (with exception for sump pumps or other dedicated equip.) 1993 Wet bar countertops within 6 feet of sink 1993 Any receptacle replaced in an area presently requiring GFCI 1996 All kitchen counters - not just those within 6 feet of sink 1996 All exterior receptacles except dedicated de-icing tape receptacle 1996 Unfinished accessory buildings at or below grade 1999 Exemption for dedicated equipment in crawlspace removed |
AuthorScott Patterson has been a professional home inspector since 1995. Scott works out of the Greater Nashville TN area. Contact his team at Trace Inspections for all of your inspection needs. 
Archives
May 2024
|
 RSS Feed