|
INGREDIENTS
• 1 tablespoon butter or EVO • 1/2 cup chopped green onions • 1/2 teaspoon garlic powder • 1/2 teaspoon of fresh grated nutmeg • 1 (4 ounce) can diced green chilies • 1 (10.75 ounce) can condensed cream of chicken soup • 1/2 cup sour cream • 1 1/2 cups cubed cooked chicken breast meat • 2 cups shredded Mexican style cheese, divided • 6 (12 inch) flour tortillas • 1/4 cup milk DIRECTIONS Cooking the chicken with additional ingredients: I like to use breast meat off the bone. Before I cook the chicken I slice it into small cubes, I season it and let it sit for about an hour or longer in the refrigerator. Season the chicken with 4 cloves crushed garlic, ½ tsp. turmeric, 2 tsp of sea salt and about a ¼ cup of chopped fresh cilantro. Mix the seasonings in a gallon zip-loc bag and pour about a ½ of olive oil into the bag. Mix well and then add the chicken and return to the refrigerator. If you can let it sit over night it is fantastic, but just an hour or two will work!. Preheat oven to 350 degrees F (175 degrees C). Lightly grease a large baking dish. In a medium saucepan over medium heat, melt the butter/EVO and sauté the green onion until tender (about 3 to 4 minutes). Add the garlic powder, nutmeg, then stir in the green chilies, cream of chicken soup and sour cream. Mix well. Reserve 3/4 of this sauce and set aside. To the remaining 1/4 of the sauce in the saucepan, add the chicken and half of the shredded r cheese. Stir together. Fill each flour tortilla (about 10) with the chicken mixture and roll up. Place seam side down in the prepared baking dish. In a small bowl combine the reserved 3/4 of the sauce with the milk. Spoon this mixture over the rolled tortillas and top with the remaining shredded cheese. Bake in the preheated oven for 30 to 35 minutes, or until cheese is bubbly. Well I had a first today!
As usual I arrived about 20 minutes before my client or their agent. As the house was vacant I was alone, so I started to get some of the "Grunt" work done. This house was right at 125 years old with a stone foundation and a basement. I found an access door, similar to a crawlspace hatch on the side of the house. What I did not realize at first was that this was an old coal shoot that went down to the basement. I also did not realize was how steep and slick it was. I slid about six feet down to the dirt basement floor, it took only one attempt to realize that my petite 6'1" 260lb body was not going to make it back up! I was stuck in the basement! The basement had stairs that went up to the house but the door was locked from the inside of the home. So I proceeded to get my cell phone out of my pocket, and low and behold I had left it in my truck! OK, it is getting past funny now...... About 15 minutes later I hear a car drive up, it was my client! He heard me calling out the coal shoot and came to the entrance. After he stopped laughing, he called his agent. She said that she was just leaving Panera from eating lunch and she would be a little late!!! TYPICAL I was thinking! Anyway about thirty minutes later she pulls up and I'm out of the basement in short order. The only good thing to come out of this episode was one of the best basement inspections I have ever done! So how is your day going! 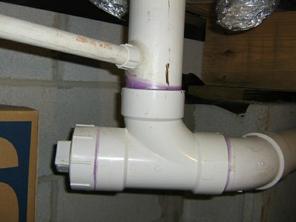 Did you know that one of the most common problems that home inspectors find is the direct connection of the Air Conditioning condensation line to the homes sewer system! Yuck!
I can't tell you how many times I have seen air conditioning condensate being emptied directly into the homes waste plumbing line. Outside of this being against building codes (both common sense and written) it is also unhealthy. What most folks do not realize is that the condensation drain line is connected directly to the evaporator coil cabinet and that it is under negative pressure. That means that it can actually suck air into the system and then into the living area. This is one of the reasons that the manufacturers require an air gap of trap on the line shortly after it leaves the cabinet. The air gap or trap works until it goes dry, this happens during the winter months when the A/C is not used. The water dries up and the systems starts sucking in air. If it is connected to the sewer line it will suck all types of little nasty's into the air that you are breathing. Legionnaire disease can start this way! So can you see the direction we are heading and why it is not a good idea to connect a condensation drain line to a homes waste plumbing lines! If the condensation line is connected to the homes sewer system it can draw sewer gas and bacteria into the homes HVAC system and into the living are of the home. It can drain indirectly to the homes waste plumbing system or it can drain to the exterior of the home, it just can not be connected directly to the homes waste plumbing and this would include the homes vent stacks or pipes. I found this condensation line connected directly to a 4" waste line, a toilet was sitting directly above and on the top of the pipe! The HVAC contractor did this and really caused a problem. In order for this to be properly repaired the 4" section of pipe will need to be replaced, you can't patch or plug the hole that was made for the condensation line. 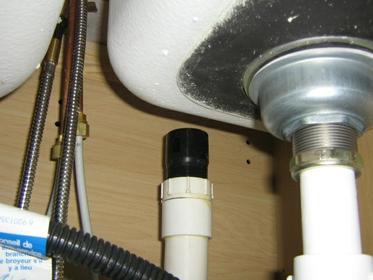 What is that thing under my sink?
All homes have sinks, many kitchen and wetbar sinks are equipped with a small valve that is attached to a pipe on the drain line under the counter. The purpose of this valve is to allow air to enter, but not to escape the plumbing waste line. Without this equalization of the air pressure in the line the water will not drain properly out of the sink. Think of a soda bottle that is full of water. You turn the bottle upside down and the water has a hard time getting out; but if you tilt the bottle to allow air to enter then the water flows freely. The same principle applies to the waste plumbing system in your home. Air must enter for everything to flow properly. Now for the problem! Well, it's not really a major problem but it could cost you a plumbers service call and about $40 worth of repairs. The problem arises when builders or plumbers install what is called a Mechanical Vent in place of an Air Admittance Valve or AAV. Why do you ask? The cost! A Mechanical Vent cost less than $10 and the AAV will cost around $40-$50. Mechanical vents are not allowed in residential homes, only the AAV should be used. Note: The Mechanical Vent is only allowed in manufactured homes, aka, Doublewides! Both will do the same job of allowing air to enter the plumbing system, but the difference is that when the Mechanical Vent fails it fails in the open position. This will then allow sewer gas to enter the home. When the AAV fails it does so in the closed position so all that you have is a sink that will not drain very well. They will last on the average about 7-10 years under normal use before they need replacing. If you have a home with a sewage odor that you can't find the source, this could be the culprit. The Mechanical Vent is easy to identify. It will be made from black plastic and has two or three rectangle openings on its side and you can see the spring. The AAV will be made from white to tan plastic with no spring large openings. The picture at the top of this page is a mechanical vent. The repair! You just simply replace the Mechanical Vent with an AAV! They screw into the same fitting. It is a very simple repair but as with all plumbing repairs it is always best to call a plumber, just in case! So look under those sinks and see what you have. If you see a black top on a pipe chances are that you have a Mechanical Vent. I have been asked a couple of time what are the "Red Flags" that trigger an insurance company to look at a home with the intent of dropping or not ever covering a home, or a mortgage not being issued. This can be a serious problem when a person is trying to buy a home, or they have already bought it and then they are dropped. Many insurers and lenders will not even entertain covering a home that is over 30-40 years of age without an inspection of the major systems. They call them 4-Point inspections.
Over the years I have seen the following electrical items cause problems with obtaining insurance or a mortgage:
I have also seen the following items causing problems with coverage:
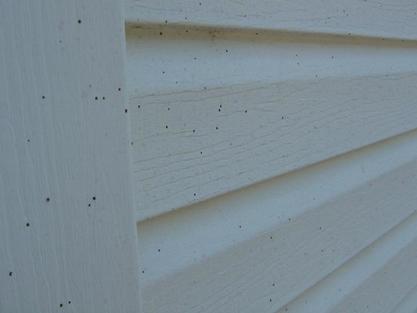 If your siding, car, fence or any other surfaces around your house have broken out with a rash of black or dark-brown specks that do not want to come off, you are probably at war with something called Artillery fungus.
I have seen this on many homes over the years, but I have noticed a drastic increase in the number of homes that have been "shot"! The following picture is from a home that I just inspected, even the PVC plastic privacy fence had been shot! The artillery fungus, cannon fungus or shotgun fungus resembles a tiny cream or orange-brown cup with one black egg. The cup is approximately 1/10 of an inch in diameter. Areas of mulch with artillery fungi may appear matted and lighter in color than the surrounding mulch. The fruiting body of this fungus orients itself towards bright surfaces, such as light-colored houses or parked automobiles. The artillery fungus "shoots" its black, sticky spore mass which can be windblown as high as the second story of a house. After doing some research I think that I have discovered why we are seeing more homes with artillery fungus problems. It looks like the appearance of Artillery fungi has been associated with wood mulch (versus bark mulch) and the increased use of wood products in potting media. Mostly the use of ground-up wood pallets and unused pulp wood and the use of fallen trees from storms that have been ground into mulch . The best way to limit your exposure is the composting of these products prior to incorporation into media is encouraged to prompt the growth of beneficial antagonistic organisms. Better yet, use only the bagged or prepackaged mulch from a garden center. Bulk mulch (not in bags) tends to be more of a raw material that could contain spores. Also, the use of gravel mulch, stone, pea gravel, and black plastic next to buildings instead of using wood products will help reduce the problem. If wood products are used, the addition of about 3 cm of fresh mulch to cover old mulch each year may lessen the problem. Use of bark products, rather than wood products, may also lessen the fungal spread. One word of warning to homeowners wishing to replace house siding splattered by Artillery fungi --- insurance companies may not cover claims of damage due to "molds".  Ten Commandments Southern Style….
Some people have trouble with all those 'shall's' and 'shall not's' in the Ten Commandments.. Folks just aren't used to talking in those terms. So, in middle Tennessee they translated the 'King James' into ' Jackson County ' language.....no joke (It's posted on the wall at Cross Trails Church in Gainesboro , TN ). All of it ain't totally correct (but you get the picture). (1) Just one God (2) Put nothin' before God (3) Watch yer mouth (4) Git yourself to Sunday meetin' (5) Honor yer Ma & Pa (6) No killin' (7) No foolin' around with another fellow's gal (8) Don't take what ain't yers (9) No tellin' tales or gossipin' (10) Don't be hankerin' for yer buddy's stuff Now that's plain an' simple. Y'all have a nice day! 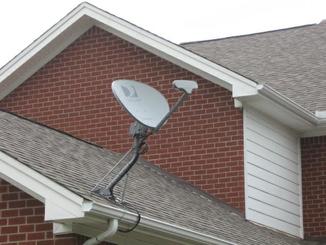 I know that just about everyone has seen those roof mounted satellite dishes for Direct TV. Have you ever wondered why they put them on the roof? Would you belive that is the easyest way to mount one! It is also 100% incorrect. Every single roofing manufacturer states that their products are not to be punctured in anyway, shape or form. They go on to say that if the shingle is punctured that it needs to be replaced.
Why do the manufacturers not want holes in their shingles? Could it be that holes tend to leak! The satellite dish installers could care less about your roof, their job is to install the dish as quick as they can and then move to the next victim. So the next time you see this type of roof mounted dish you will know that it is wrong! The owner of this home kept trying to tell me that it must be OK, because all of the other homes in the area have been done like this. I could not make him understand that Direct TV does not control what is right when it comes to roofing materials. I have also noted that many home inspectors are not reporting them either. I just finished reviewing three reports from home inspectors who did not note the roof mounted dishes. All three homes have had problems. Two of the homes have roof and wall damage from water leaks and the other had a section of the roof (along with the dish) torn off in a thunderstorm. The dish acted like a sail and as it was only screwed into the OSB decking, that section of the roof took off like a sailboard. 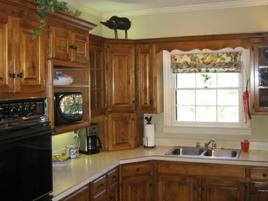 Well, if your kitchen cabinets are full of dishes like the ones in our home you might want to take a moment and check them after reading this short post. Just think about all of the weight that an average cabinet is hold when it is full of dinner plates, cups, saucers, mixing bowls and the like. It is simply amazing how much weight they can and should hold. But, have you ever given much thought as to what is holding those cabinets up on the walls? With prefabricated or factory built cabinets most are secured with screws (hardware) that is either provided by the manufacturer or it is specified in their installation manual. Most of the screws will have a torque head that requires a special driver bit that has a point that kind of looks like a star. The screw have specific places on the cabinets that they are to be inserted, they are structural points built into the cabinets to help support the weight. The key to placing the screws is to locate a wall stud that will hold them. Keep in mind that depending on your home they might be placed at 16" to 24" intervals in the walls. It is imperative that the screws are inserted into the wall studs and not the drywall. Many times an additional piece of lumber is placed on the wall, it is secured to the studs and then the cabinets are secured to that piece of lumber. Why do I bring this up? Well, this week while inspecting a nice home I discovered that the kitchen cabinets were literally falling off the walls! The contractor had screwed through the back of the cabinet, securing it to the wall. The problem was that the back of the cabinet was just a thin piece of panel like material that had not one thing to do with the structural strength of the cabinet. The thin back of the cabinets had detached from the wood boxes of the cabinets and the cabinets were falling forward. It was only a matter of time or an additional plate or glass before they fell!
OK, now it is time for the dreaded home inspection! First off, nobody should be dreading the home inspection, unless the house is really in poor condition. The list of items below will help the homeowner to prepare their home so that the inspector will be able to perform the inspection with ease. The last thing you want is for the home to be difficult for the inspector! Clean and neat homes for some reason tend to perform better when it come to a home inspection! Just saying........
Items the homeowner can repair or take care of before the home inspection:
Preparing the home for the day of the inspection:
|
AuthorScott Patterson has been a professional home inspector since 1995. Scott works out of the Greater Nashville TN area. Contact his team at Trace Inspections for all of your inspection needs. 
Archives
September 2023
|

 RSS Feed