|
Through trial and error I have made one of the better buttermilk biscuits that I have had in a long long time! It takes about 15 minutes of prep and about the same time cooking. I prefer a square biscuit over the round ones, but you can cut them into any shape you desire. These biscuits have multiple layers of tender love! This recipe will make about 8-10 biscuits.  This is the recipe:
For starters the butter and buttermilk must be very cold! This is very important for fluffy biscuits! Mix all of the dry ingredients together in a medium size mixing bowl. I use a fork to make sure it is mixed well. Next get you cold stick of butter and cut in half. Take each half and slice lengthways, you should get about 4 thin slices. Next slice those slices lengthways (Hint: I stack them up 4 slices to a stack to make it easier to slice again). Then slice those stacks into small cubes.. This is key to a fluffy biscuit! Add the cubed butter to the flour mix.
Using a fork mix the butter into the flour until it is a crumbly texture. (Hint: I have used my hands to kind of break up the clumps, you just do not want the butter to melt from the heat of your hands!). Next, add the buttermilk and mix with the fork until it comes together into a rough ball. Dump out onto a floured surface and mix any unmixed pieces into the ball. With a rolling pin, work the dough into a 12" square and an inch thick. With a knife cut that square into about four strips and stack on top of each other. You might need some more flour at this point to keep things from sticking.... Roll the strips out into another square and repeat this process one more time! Next roll the dough into a rectangle about an inch in thickness. At this point you are ready to cut the biscuits into the shape you want. (Hint: Push the cutter down onto the dough, do not twist as you cut! Twisting seals the edges and prevents the biscuit from rising!) Place each cut biscuit onto a parchment paper lined cookie sheet. I have found it is better for the biscuits to touch each other, it will help them rise a little more. Brush the tops with melted butter and bake at 425f for about 13-16 minutes depending on your oven. When golden brown, remove and brush the tops again with melted butter.. Enjoy! Makes about 8-10 biscuits. Do you have a male dog and an air conditioner unit in the backyard? I'm sure you are wondering what in the world do the two have to do with each other! Well, male dogs like to mark their territory and the outside A/C condenser unit is a favorite target! Their urine is very corrosive and can literally damage the soft metal fins and coils to the point that the unit needs to be replaced. This is a common find during a home inspection. 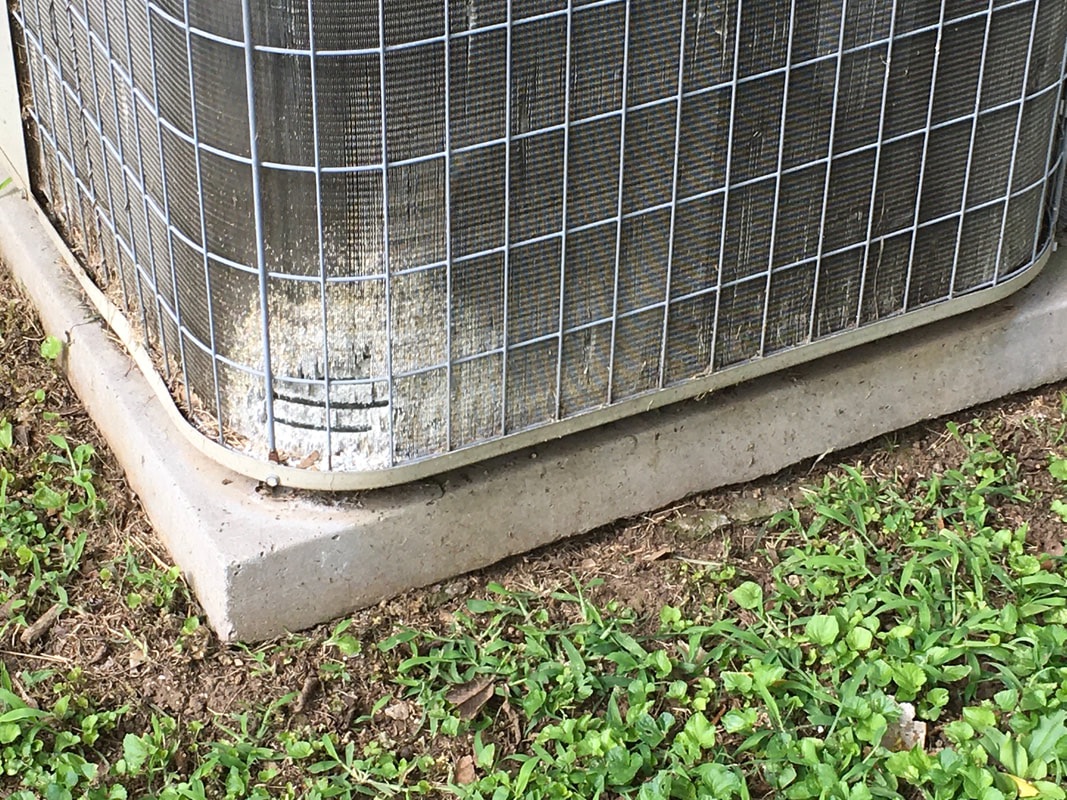 This is an example of damage that occurred in about six months! We have seen much worse, but even this small section has compromised the efficiency of the unit. You can help to prevent this type of damage by placing an inexpensive lattice work trifold screen around the sides and front of the unit. This will also help hid the condenser unit from view and may even dampen the sound from it running. Just be sure to make sure it is easily moved in the event that service is needed.
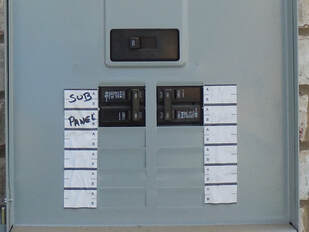
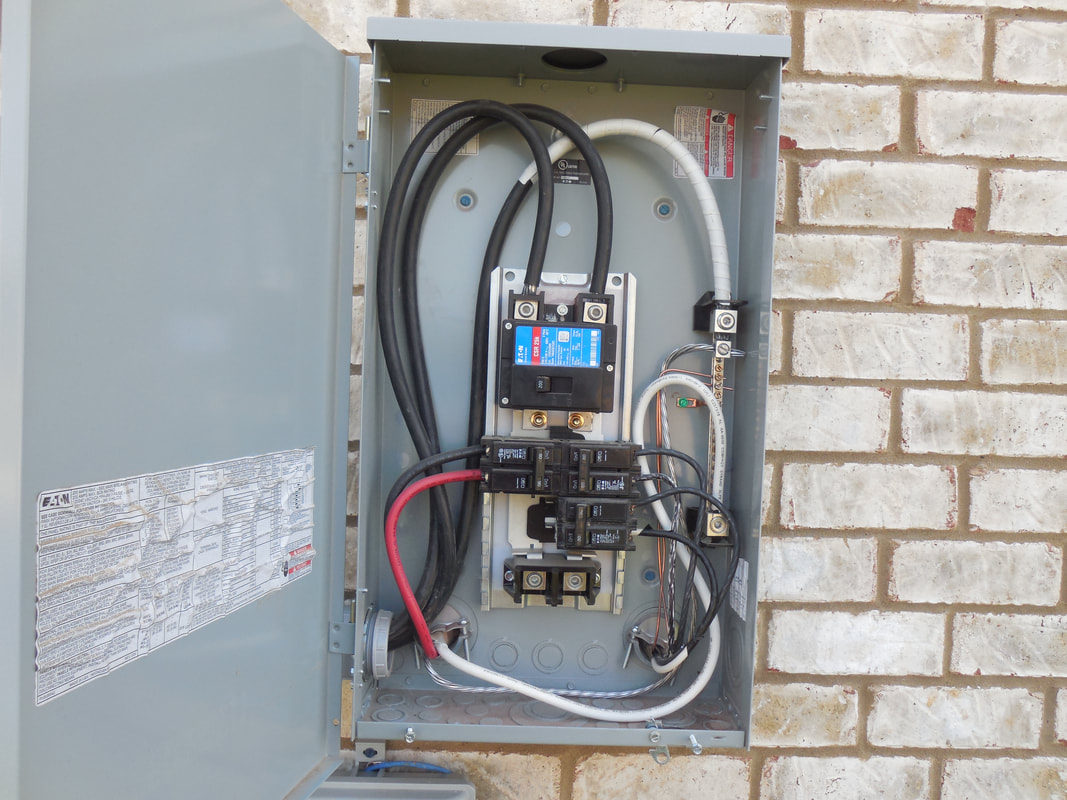
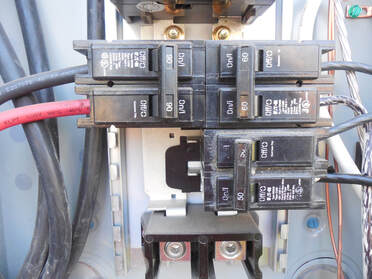
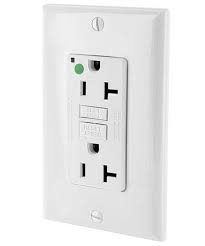 Ground Fault Circuit Interrupter or GFCI A ground fault circuit interrupter, called a GFCI or GFI, is an inexpensive electrical device that can either be installed in your electrical system or built into a power cord to protect you from severe electrical shocks. Most handheld hairdryers have a GFCI as part of their power cord. GFCIs have played a key role in reducing electrocutions. Greater use of GFCIs could further reduce electrocutions and mitigate thousands of electrical burn and shock injuries still occurring in and around the home each year. Ground fault protection is integrated into GFCI receptacles and GFCI circuit breakers for installation into your electrical system, especially for circuit outlets in particularly vulnerable areas such as where electrical equipment is near water. Portable GFCIs are also available to provide on-the-spot ground fault protection even if a GFCI is not installed on the circuit. The GFCI is designed to protect people from severe or fatal electric shocks but because a GFCI detects ground faults, it can also prevent some electrical fires and reduce the severity of other fires by interrupting the flow of electric current. What Is A Ground Fault? A ground fault is an unintentional electrical path between a power source and a grounded surface. Ground faults most often occur when equipment is damaged or defective, such that live electrical parts are no longer adequately protected from unintended contact. If your body provides a path to the ground for this current, you could be burned, severely shocked or electrocuted. How Do They Work? A GFCI constantly monitors current flowing through a circuit. If the current flowing into the circuit differs by a very small amount (as little as 0.006 amperes) from the returning current, the GFCI interrupts power faster than a blink of an eye to prevent a lethal dose of electricity. GFCIs are designed to operate before the electricity can affect your heartbeat. A GFCI works even on two-slot receptacles as it does not require a grounding conductor for it to work! Actually, GFCI’s were first used to provide protection on older ungrounded electrical systems in homes. They worked so well, they soon became the standard in all homes. Here's an example: A bare wire inside an appliance touches its metal case. The case is then charged with electricity. If you touch the appliance with one hand while another part of your body is touching a grounded metal object, such as a water faucet, you will get shocked. If the appliance is plugged into an outlet protected by a GFCI, the power will be shut off before a fatal shock can occur. Where to Install/Use The circuits that require GFCI protection are designated by the National Electrical Code (NEC).1 The NEC typically only applies to new construction/major renovations. The coverage of GFCI protection has gradually increased over the years. NEC GFCI requirements (and effective date-most common are listed): 1968 Underwater pool lighting 1971 Receptacles within 15 feet of pool walls 1971 All equipment used with storable swimming pools 1973 All outdoor receptacles 1974 Construction Sites 1975 Bathrooms, 120-volt pool lights, and fountain equipment 1978 Garages, spas, and hydromassage tubs 1978 Outdoor receptacles above 6ft.6in. grade access exempted 1984 Replacement of non-grounding receptacles with no grounding conductor allowed 1984 Pool cover motors 1984 Distance of GFCI protection extended to 20 feet from pool walls 1987 Unfinished basements 1987 Kitchen countertop receptacles within 6 feet of sink 1987 Boathouses 1990 Crawlspaces (with exception for sump pumps or other dedicated equip.) 1993 Wet bar countertops within 6 feet of sink 1993 Any receptacle replaced in an area presently requiring GFCI 1996 All kitchen counters – not just those within 6 feet of sink 1996 All exterior receptacles except dedicated de-icing tape receptacle 1996 Unfinished accessory buildings at or below grade 1999 Exemption for dedicated equipment in crawlspace removed 2003 Smart “Lock-out” type receptacles required (Mfg. requirement) 2005 Laundry and Utility sinks 2005 Wetbar sinks 2008 All receptacle outlets in damp locations required to be listed as weather resistant. "WR" must show 2011 All receptacle outlets in unfinished basements, except permanently installed fire alarm or burglar alarm system. 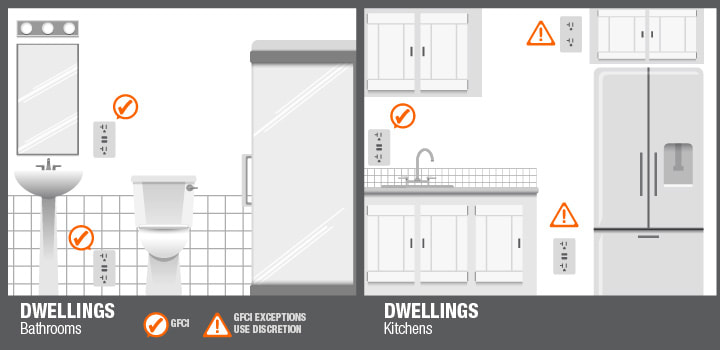 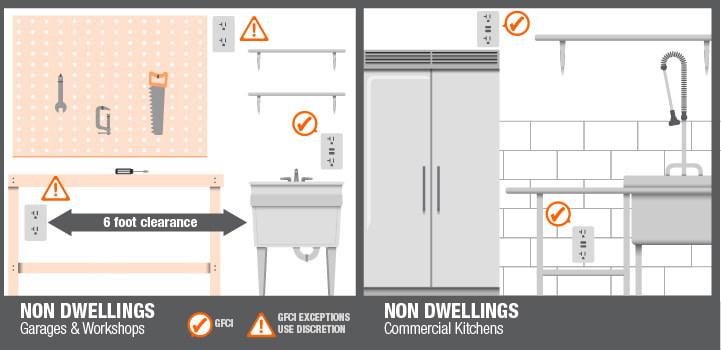 When a new subdivision is built the builders often build a "Model" home as the first home in the subdivision, it doubles as a sales center and provides an example of what the homes will look like. What many do not realize is that this first home is often the "practice" home for new floor plans, systems and more! We tend to find some very special and unique issues with "Model" homes. This electrical panel is a good example of a special find! On first look it looks like a normal service entrance panel with the main breaker and two sets of 240v breakers. But once you remove the panel cover...... Surprise! We have a third set of breakers that were hidden!
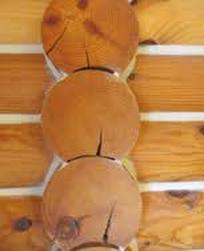
 This is why it is so important to get that new home inspected and never buy a new home, especially a "Model" Home without a full home inspection!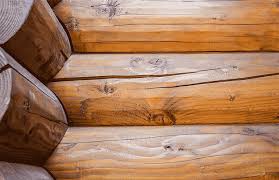 With all or the log and timber framed homes that I have the pleasure of inspecting, it is common for folks to ask about the condition of the logs or timbers. The most common question I get has to do with the large horizontal splits in the logs which are commonly mistaken for cracked or damaged areas of the logs. This is part of the natural drying process of logs! The checking as it is called does not impact the structural integrity of the log, but depending on the location, size and or depth of the checking water seepage can become an issue. With severe checking we do recommend sealing with an approved flexible sealant.
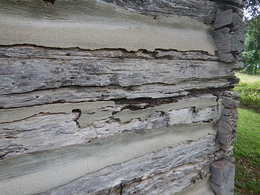 Now how do you know the difference between weather damage, rotting, insect damage and checking? Once you see them side by side it is easy to distinguish. This is a picture of weather damage and insect damage on timbers that are around 200 years of age. Many times checking if it is exposed can collect water and lead to more problems. The chinking used on this cabin is a concrete mortar type. It has actually helped to speed up the deterioration that we are seeing in this photo. The key to log lasting logs is to maintain them with a penetrating stain or finish which seals and protects the logs from the elements and deters insects. If the logs/timbers have chinking (the material that fills in the space between the logs/timbers) this needs to maintained. Never use concrete mortar mix or similar products, but use a modern flexible chinking. Most are silicone or acrylic based and will fill in all of the gaps and cracks between the logs creating a weather-tight seal to help with heat loss and air infiltration. The old mortar based chinking that we still see absorbs water and does not allow for proper drying of the spaces. This leads to and increase in water seepage and damage of the area. The brands of Chinking we like are called Perma_Chink and Big Stretch and Log Jam by Sashco. Trace Inspections inspects more log homes than any other home inspection company in Tennessee and in the region. Let Trace Inspections Inspect your next Log Home.
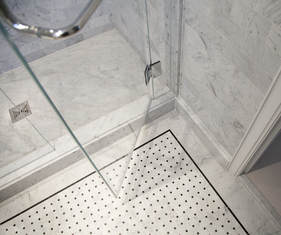 If your home is anything like ours, you have a household chore that it not on the top of the list and that is cleaning the tub and shower! When we cleaned the tub or shower, we felt like it took forever! And it seldom ended up feeling or looking as clean as I’d have liked it to, even after repeated scrubbing. After a while, I was starting to suspect that our hard water was combining with the soap scum to form an impenetrable layer of super-scum that simply couldn’t be cleaned. Our water is so hard, you can drive nails with it! Then I came across an easy homemade shower/tub/tile cleaner that promised to erase tough stains, soap scum, and hard water deposits. It was also safe for fiberglass tubs and showers. And it wasn’t just one person’s opinion; I found dozens upon dozens of reviews for this cleaner all over the web and even from some friends that had been using this mixture for years! We had everything on hand, so I gave it a go. This is what you will need: Homemade Shower Cleaner and Soap Scum Remover:
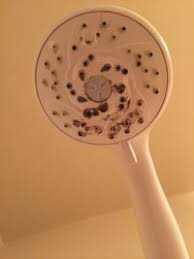
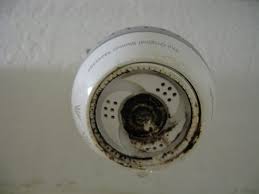
When using, make sure your bathroom is as well-ventilated as possible. The first time I used it, my wife had a fit that the odor was going to stay around for days! Turn on the fan and open any windows, because this stuff is POTENT. It smells really strongly of vinegar right after spraying it, but the smell does dissipate fairly quickly. But the end result is well worth your home smelling like a pickle jar for an hour or so, I promise! AuthorScott Patterson, as a home inspector has the opportunity to visit hundreds of homes a year and see's first hand what a clean bathroom can do for the sale of a home! If you are planing on selling your home, those bathrooms must look like a 5 Start hotel bathroom! Sparkling Clean! 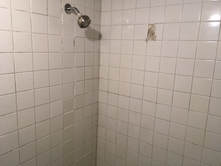 I noticed that every time I took a shower at my home I would almost always start coughing during and after the shower. After I was finished with the shower my coughing would lessen and I would seem to get better. I also noticed that when I was out of town and staying in a hotel that I seldom coughed when taking a shower. Now, I’m not a rocket scientist but it does not take one to figure out that the shower was the common denominator in my coughing. After looking at the shower head I noticed black and green slime inside some of the showerhead holes and then after spraying it with a household bleach I noticed the slime (mold) disappeared. Now showerheads are not expensive and can be replaced for under $20 for a simple showerhead. So, after a trip to the local hardware store I had a new and mold free showerhead installed in my shower.
Guess what? The coughing attacks are no more! It was as simple as replacing our 10 year old showerhead. I honestly feel that my overall health has also improved and with an $18 showerhead.
So, if your showerhead has any signs of abnormal growth or deposits on it, go ahead and do yourself and family a favor and replace it. They are simple to replace, and the rewards can be great. So, you are buying a home and it has EIFS or Stucco on it and you need a home inspection!
You might be wondering what is EIFS? Well EIFS is the acronym for Exterior Insulating Finish System or artificial stucco. What you might not also realize is that around 10% of home inspectors will not inspect this type of cladding as part of a normal home inspection and disclaim it! Then you are forced to hire a second inspector that is qualified and able to inspect the cladding (stucco/EIFS) on the home. A special Stucco/EIFS inspection only can cost as much if not more than some home inspections. But if your inspector can inspect systems like this the overall fee will normally be just a little more than a basic home inspection. What is so different about Stucco or EIFS? The major issue is that moisture(water) can seep into the walls of the home and cause extensive damage. This normally happens from improper installation and or lack of maintenance. With most homes, everything looks normal on the interior of the home so the owner is seldom aware of what has been going on in the walls. As a buyer, you need to let your home inspector know that the home has Stucco or EIFS on it before you hire them. With around 10% of all home inspectors having the ability to inspect this type of exterior cladding you must ask them if they are knowledgeable of Stucco/EIFS. Then you need to inquire if they have the specialized equipment to inspect it as part of the normal home inspection. Hopefully they will be able to take care of the entire home during the inspection. If not, then you need to keep looking for a qualified home inspector. If you have a home with EIFS/Stucco or even artificial stone(AMSV) call Trace Inspections, LLC. We are qualified and certified to inspect specialized systems like this. 615-302-1113 Next time you see a water heater look for a little yellow tag that should be hanging on what is called the TP relief valve on the side of the water heater. This yellow hang tag tells about this valve and how it should be tested and installed on the tank. It is one of the most important safety features on a water heater. Properly installed and maintained this valve will help to keep you safe if your water heater decides to go haywire. The following PDF is one of those little yellow tags along with a good deal of information about the valve, it was produced by a company that makes a device to help prevent improper connections of the required drain line to the valve .
For those of you that have a fireplace and chimney, when was the last time that you had it inspected? It's one of those things that folks just do not think about until they have a problem, that same can be said for septic tanks and that will be a topic for another day! Homes generally have a masonry chimney flue or a metal fabricated flue. The modern or more common masonry flues are usually lined with a terra-cotta tile liner which provides a smooth solid surface for the smoke/combustion gases to escape. The metal flue is usually fabricated in sections and assembled with interlocking sections forming a smooth solid surface as well for the smoke to exit the chimney. Regardless if it is masonry or metal they both need to be maintained, they are not maintenance free! I'm going to address two of the most common problems that I find with chimneys. Creosote When wood is burned, more than just smoke goes up the chimney. Creosote is deposited inside the chimney lining. Creosote is a black or dark brown tar, and soot is a fine carbon powder which colors smoke. The combination of creosote and soot is usually what is referred to as creosote in the chimney. There are several forms of creosote, they are all dangerous because they are flammable and can cause chimney fires. Every year, many thousands of house fires are caused because of dirty chimneys which haven’t been properly maintained. This is why it is so important to have your chimney cleaned and inspected by a qualified chimney sweep on an annual basis if you use it often. The following pictures are chimneys with creosote problems! 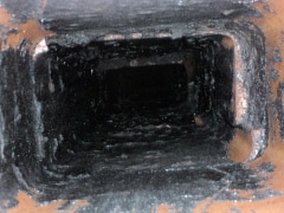 A tile lined chimney with a heavy buildup of creosote. Major fire hazard that is just waiting for a spark to ignite the creosote. 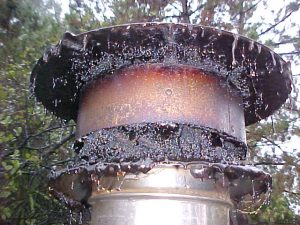 Metal chimney with one of the worst cases of creosote buildup I have ever seen. The entire metal flue had to be replaced on this home. The chimney crown and cap The top of your chimney structure is called the chimney crown the flue pipe is surrounded by the crown. If you have a chimney cap, which is recommended it will be on the top of the flue pipe. If a masonry chimney crown becomes cracked, it needs to be repaired so that moisture doesn’t get into the chimney system. With a metal fabricated chimney you will have a metal crown. While metal crowns do not crack, they do rust and corrode and have a typical lifespan of 20 years before they need to be replaced. Moisture is the largest natural enemy to the chimney system and can cause damage to the masonry, lining, firebox, damper, ceilings and walls in your home, and more. Chimney caps also protect the chimney from moisture but also keep out critters, birds and other debris. With a masonry or metal chimney the crown protects the entire chimney structure by shedding water. A good crown will keep water out of the chimney structure while a bad or cracked crown will allow water to seep into the chimney structure which can cause extensive damage to the chimney and the home. This is a metal chimney crown that needs to be replaced. It has rusted through and water is seeping into the home. 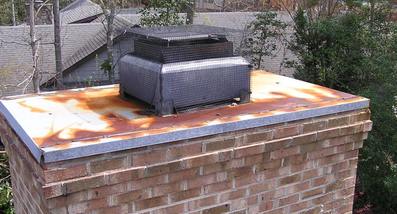 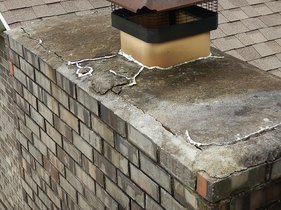 This masonry chimney has a severally cracked crown and the cap is corroded.
Be sure to look for a chimney sweep that is a member of the National Chimney Sweep Guild and the Chimney Safety Institute of America. Their members tend to be the leaders in their profession. Good chimney sweeps can keep your fireplace and chimney in good working condition for years and years of enjoyment. |
AuthorScott Patterson has been a professional home inspector since 1995. Scott works out of the Greater Nashville TN area. Contact his team at Trace Inspections for all of your inspection needs. 
Archives
September 2023
|
||||||||
 RSS Feed