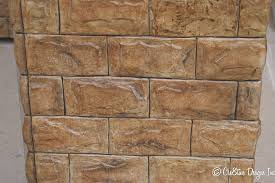
  Faux Stone, Man-made Stone, Cultured Stone, and my favorite, “Lick-n-Stick Stone,” are all names for manufactured stone veneer or AMSV (applied manufactured stone veneer).
Manufactured Stone Veneer is a product that looks like natural stone, but is manufactured with concrete. Today the veneer is increasing in popularity and being used to give commercial, residential, and landscape applications a rich, upscale look. The advantages of manufactured stone veneer over natural stone are: • Cost (cost of material, cost of application) • Weight (ease of application) • Variety of designs and colors • Good look for home, office, Hotel etc. Manufactured veneer is cheaper than natural stone, approximately 1/3 to 1/2 the cost of natural stone. Its lightweight eliminates the need for wall ties or footings and makes it easier and cheaper to build. The variety of designs and colors makes available options, which would not be available with natural stone, since natural stone is used in the general area around the locality, which it is extracted. There are also disadvantages for stone veneer compared to natural stone: It is not as strong as natural stone; if a piece breaks, or if a piece is removed from the wall, then unless it is replaced, it shows significantly; it is not reusable as natural stones are. Furthermore, manufactured stone veneer has a larger waste factor than natural stone. Natural stone can be chipped, cut, and shaped to any size needed. The cut off pieces can be reused. While manufactured stone veneer cannot be cut to fit because it exposes the undesirable inner concrete from which the manufactured stone is made of. I often find cut and broken pieces on new homes. Those cut or broken pieces really stick out like a red flag once you know what to look for. Manufactured stone can contain lime nuggets and iron ore, which can leech out, and stain the surface over time when exposed to water. Manufactured stone is not a naturally occurring product and, due to its cast origin and painted or dyed exterior, it is subject to color changes caused by exposure to the UV in sunlight and moisture. It is also a very labor intensive product to install, not unlike stucco. In fact I call it “Bumpy Stucco” as it is basically installed in a similar fashion. Manufactured stone is a porous product. It absorbs much more water than real stone and it will transfer the moisture through and into to the wall of the structure causing many of the same issues seen with improperly installed stucco. Being a porous product manufactured stone is subjected to ice wedging and freeze thaw problems. As water seeps into the manufactured stone and then freezes, chunks of the face will pop off leaving a rugged edge, which looks similar to the edge of a broken sidewalk. Repair can be expensive as the entire piece of stone must be cut out and replaced. The repair also doesn’t stop the issue from re-occurring. I and many other experts feel that AMSV is the next EIFS or Artificial Stucco fiasco! We are seeing more and more signs of issues with this product. If you think you have a moisture problem with your AMSV do not wait any longer. If you need a referral to an inspector in your area, I might be able to direct you to a knowledgeable person. Give me a call or email I will be glad to help if I can. Smoke Alarms! Well, we also call them smoke detectors but, in all reality, they are smoke alarms. They are designed to alert you to the presence of smoke which is usually a rather good indicator of a fire either in the flame or smoldering stage. Smoke alarms save lives. Smoke alarms that are properly installed and maintained play a vital role in reducing fire deaths and injuries in homes and commercial buildings. If there is a fire in your home, smoke spreads fast and many the smoke will proceed the visible fire and you need smoke alarms to give you time to get out. Facts and figures about smoke alarms:
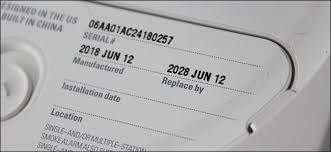
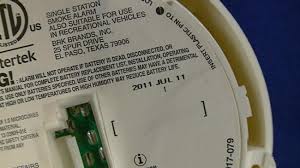
Did you know that smoke alarms have an expiration date! On the back of most smoke alarms you will find a date of manufacture or the alarms expiration date! After about 10 years smoke alarms have lost a large percentage of their sensitivity and should be replaced!
So not only do you need to replace those batteries every year, you might also need to change out those smoke alarms! Most homes built in the past 20 years will have an alarm in each bedroom, hallway, bonus rooms, basements, and the garage. My home has 6 alarms and it is only an 1900sf home! Ionization vs photoelectric
The two most commonly recognized smoke detection technologies are ionization smoke detection and photoelectric smoke detection. Ionization smoke alarms are generally more responsive to flaming fires. How they work: Ionization-type smoke alarms have a small amount of radioactive material between two electrically charged plates, which ionizes the air and causes current to flow between the plates. When smoke enters the chamber, it disrupts the flow of ions, thus reducing the flow of current and activating the alarm. Download this chart on ionization smoke alarms (PDF, 943 KB). Photoelectric smoke alarms are generally more responsive to fires that begin with a long period of smoldering (called “smoldering fires”). How they work: Photoelectric-type alarms aim a light source into a sensing chamber at an angle away from the sensor. Smoke enters the chamber, reflecting light onto the light sensor; triggering the alarm. Download this chart on photoelectric smoke alarms (PDF, 782 KB). For each type of smoke alarm, the advantage it provides may be critical to life safety in some fire situations. Home fatal fires, day or night, include a large number of smoldering fires and a large number of flaming fires. You can not predict the type of fire you may have in your home or when it will occur. Any smoke alarm technology, to be acceptable, must perform acceptably for both types of fires in order to provide early warning of fire at all times of the day or night and whether you are asleep or awake. For best protection, it is recommended both (ionization and photoelectric) technologies be used in homes. In addition to individual ionization and photoelectric alarms, combination alarms that include both technologies in a single device are available. Information provided by the NFPA You have been in your new home for almost a year. The clock is ticking on that one year builder warranty. At the one year anniversary you give up almost any chance you have in getting your builder to correct any issues you may have.
Once your builder is put on notice about these problems the builder has no recourse but to correct or address the problems under state law, even if it goes beyond the twelve months. The key is putting them on notice with the report before the first year anniversary date of your new home. Our Warranty Inspection is designed just for this purpose, so you can give your builder a written document that has all of the warranty issues known to date. We will inspect all of the readily visible structural elements and major systems of the home. Items that will typically be included in an inspection are:
Additional items and systems unique to a particular home can also be inspected. Cosmetic related issues such as paint issue are also addressed in the report.When the inspection is complete, we will tell you of any additional problems that were discovered and discuss them with you. We'll point out any safety concerns we notice. You'll also receive a full written report with photos of the inspection via email shortly after the inspection. We will also tell you about any routine maintenance that should be performed, as well as answer any questions you may have. Our goal is to discover and inform you of anything we find that might affect your new home. Don’t let the time run out on your warranty before you get everything corrected. You can schedule your Warranty Inspection anytime. An industry recommendation is to have one performed between the 9th to the 11th month of ownership. We even have folks that schedule a warranty inspection months in advance so that it will not be forgotten. Just call or office or book online. Well I'm sure we have all seen this type of statement on a brochure or on a listing before. Over the years I have learned that 75% of the time this is CODE for "Buyer beware" and it just makes me look a little harder to see what I can find that was covered up. Many times updates are only skin deep or what the eye can see. Have you ever heard this saying "You can put lipstick on a pig, but it is still a pig"! This is from a recent inspection, this was on a 125 year old home in historic East Nashville, TN. I have looked at many homes in this area and for the most they are all in the 100 year old range and those that have been properly updated are really fine homes. But, I have also found many where the owners or agents claim that they have been updated when I'm sure they meant to say that they have been freshly painted! The next few pictures are what I found in the basement of this updated home: Sump pump not working 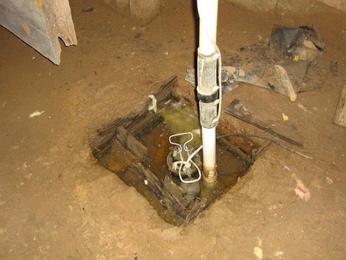 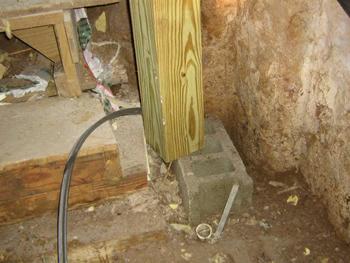 This is a 6x6 post newly installed and supporting the new master tub!  New High Efficiency HVAC split system sitting in mud from being flooded because the sump pump was not working. Unit was distroyed and will need to be replaced.
 We had a home inspection and the home inspector said that the water heater needed an "Expansion Tank" installed on the cold water supply line. What does this mean?
All tank type water heaters, regardless of heat source (gas, oil, electric, solar or indirect), can suffer the effects of thermal expansion. In every tank-type water heater, cold water is heated as it enters the water heater tank.. This increases the overall water volume and pressure inside the tank. For safety, the increase in volume and pressure must be relieved in some way. The most common is a dripping at the (temperature pressure relief)TPR valve. While this will reduce some of the pressure it can also damage the valve and prevent it from working properly. We've never had to have one before, so why now? Before major controls were placed upon city water supplies, it was possible for excess water pressure build-up in a water heater to flow back into the city water supply. This created a simple and efficient system for removing excess pressure in water heaters. Now most city water supplies are protected by backflow preventers at the meter or home. If a home has a pressure reducing valve (PRV) to reduce the city water pressure to a usable pressure inside the home this also acts as a backflow preventer. The installation of a thermal expansion tank in the cold water line of the water heater can protect the system from the damaging effects of thermal expansion and increased pressure. Most plumbers will install one for around $200 and if it is installed with a new water heater the cost is usually around $50 to $75 extra. The thermal expansion tank controls the increased pressure generated within the normal operating temperature range of the water heater. The small tank with a sealed, compressible air cushion provides a space to store and hold the additional expanded water volume.  A true southern summer delight that even Yankees end up loving!
· 1 large green tomato. Sliced thin (1/4" slice is best) · 1 cup Corn meal (not cornbread mix) · 1 cup Buttermilk · Salt and Pepper. · Vegetable oil/Coconut oil. You will need enough to cover the bottom of a black iron skillet about 1/2". We also use olive oil(not EVO) instead of vegetable oil. I think that it really gives them a better taste. Slice the tomato into 1/4 slice. Salt both sides of the slices. Lay them on several paper towels with several paper towels on top. Then place a cookie sheet or jellyroll pan on top of the paper towels. Let them sit for about an hour or longer at room temp. This will soak up all of the excess moisture in the tomato. This is the most important step in the process! Heat the oil in a black iron skillet at med-high heat. If it smokes you have it too hot! If you are using olive oil you must watch the heat, it will burn quicker than vegetable oil. A another oil I like is Coconut oil! It seems to actually cook better. Mix about 1-teaspoon salt and pepper to taste in the cornmeal. Dip each slice into the buttermilk and then into the cornmeal. Set the slice aside on a cookie sheet. Once you have done this to all of the tomato slices, you will re-dip and coat the slices again. Immediately drop the slices into the hot oil and cook until golden brown. It will only about take 2 minutes per side. You must be careful because they will burn if you are not careful! Hint: Do not use a tomato if it has started to turn red. They do not cook well and they are mushy when you eat them. Green very firm tomato's work best. They can have a tinge of yellow and still work OK. 1 large tomato will make about 8+ slices or enough for two. 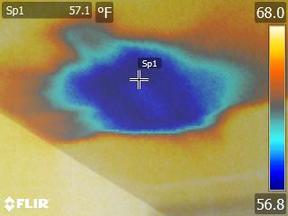 While performing an EIFS and moisture inspection on a seven year old home I discovered something that was very unique. After my exterior inspection and scanning of the EIFS with various moisture meters I moved to the interior. After looking at over 3500 EIFS structures since 1998 I have discovered that it is just as important to inspect the interior walls and to scan them with special moisture meters and with an infrared camera.
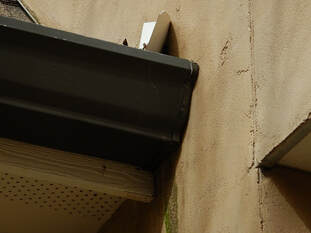
Well what I found was not moisture, which I was actually looking for and expecting to find! I found a cold spot on the ceiling in one of the rooms in this home. It was about three feet out from the wall and in the middle of the ceiling. What had I found? I found an HVAC air duct supply register that had been covered over when the home was built and the drywall was installed. The drywall contractor just failed to cut the hole out for the register and covered it! Fast forward seven years…….. The home inspector that referred the buyer to me for the EIFS inspection noted that the room was a little warmer than the other rooms, but they failed to notice that the room had no HVAC supply register in the ceiling. That is why it was warmer than any other room in the home. It is a fairly easy fix but I still chuckle when I think about how many years went by and nobody ever noticed that the room did not have a supply register in the ceiling. Being one of only a handful of qualified EIFS/Stucco inspectors in our area, I'm often called out to inspect the EIFS or stucco cladding on a home. Many times, I can see glaring issues from the street when I drive up to the home. Those issues do not take any special equipment or really much knowledge after you know what to look for. Hopefully this Blog will allow readers to identify some issues prior to making an offer on a home. 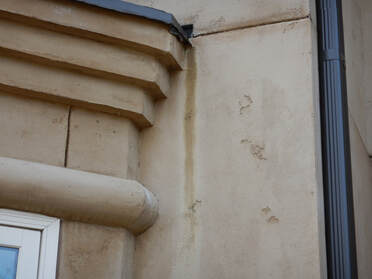 This is a hardcoat or real stucco home. This was about 12 hours after a rain shower and the water stain is a telltale sign that we have a problem. The flashing dead ends into the wall and the water has no place to go but down the wall. A simple piece of kick-out or diverter flashing could have been fabricated to direct the water off the roof instead of down the wall. The lack of rain gutters is not much help either. Look for stains, dry or wet!
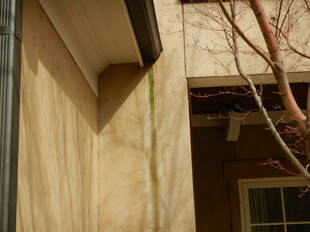
Same house, but this time they have added the kick-out flashing, but it was not installed properly! The stain is telling us that something is wrong! 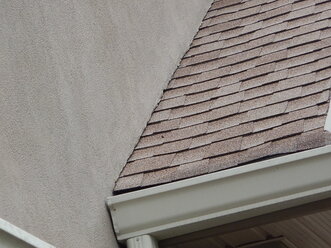 This is an EIFS home. The EIFS is on the roof line, it should be 2" above the roof surface! Also we have no visible flashing at the sidewall and the roof! It is also missing the kickout diverter flashing at the bottom to kick roof water runoff into the gutter. This you can see from the street!
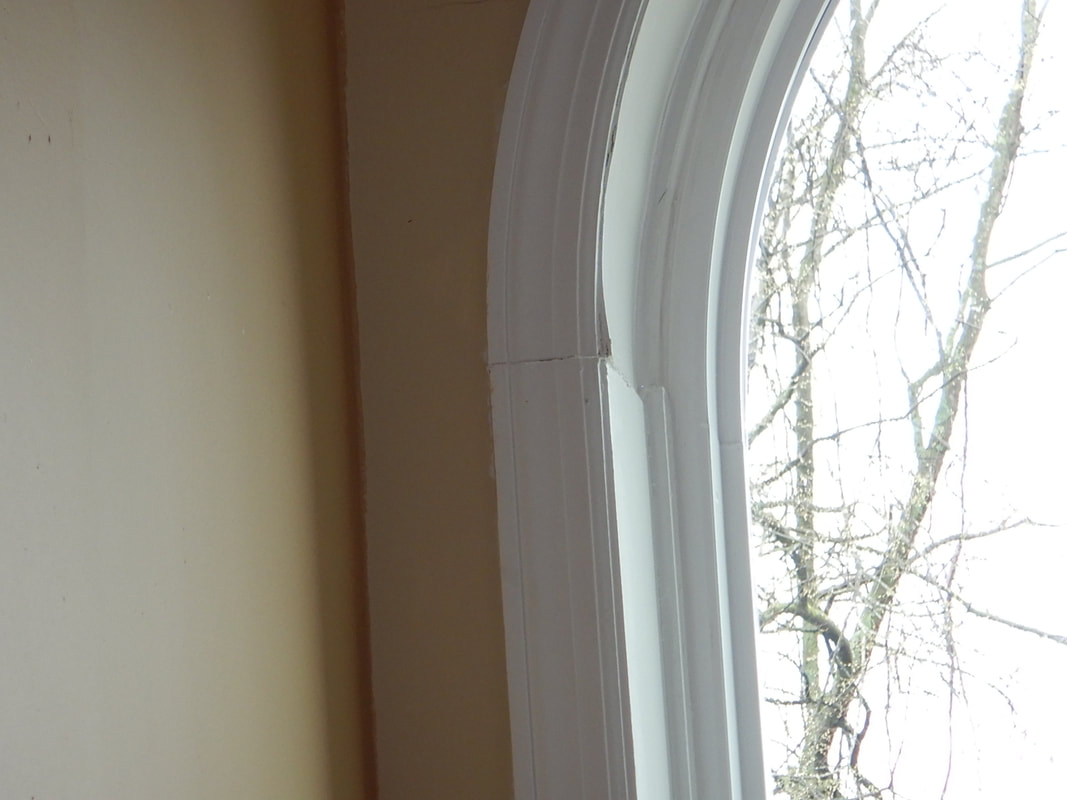
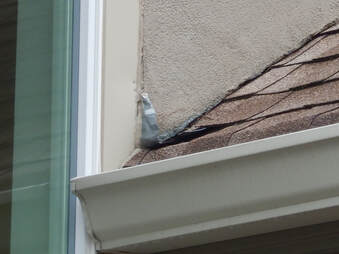
Here we have the diverter flashing, but it was just stuck into place and now it is funneling more water into the wall! The first picture is the interior of the window next to this diverter flashing. The wall is wet and the wood is swollen! The following are just some common issues that you can spot now that you know what to look for! 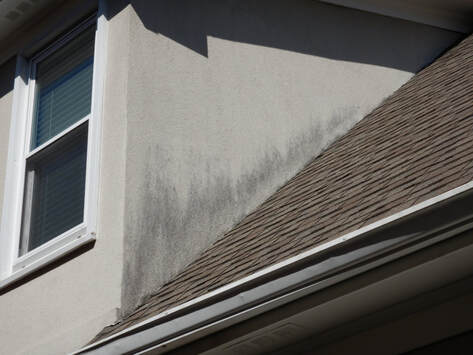 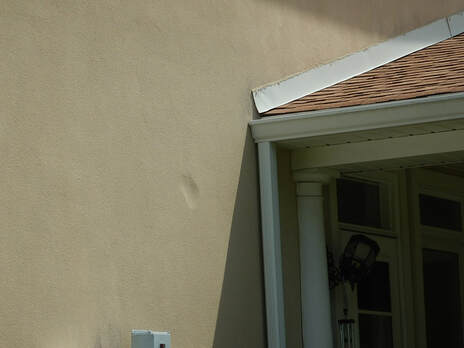 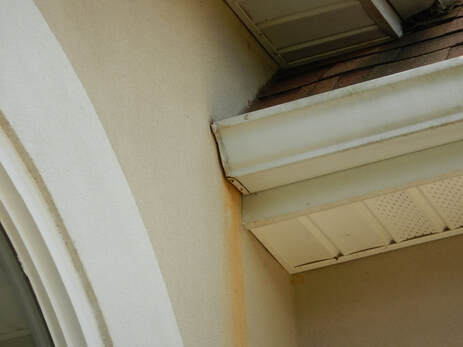 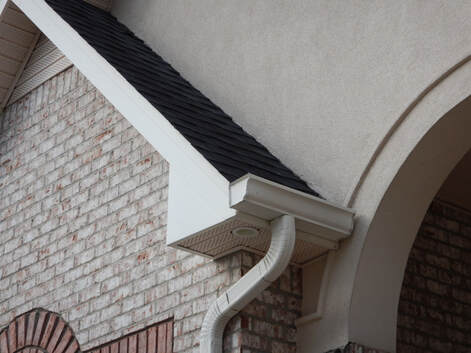 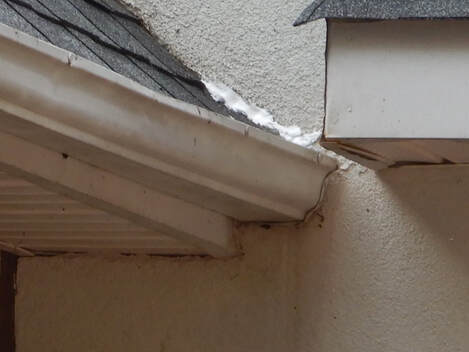 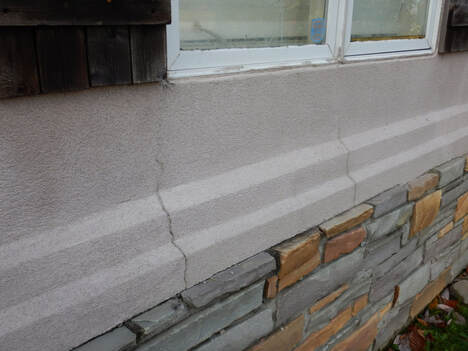 I hope that this little bit of on EIFS and Stucco problems will help you with your current home or if you are looking for a new home. Keep in mind that we are one of just a few companies in our area that can offer an EIFS/Stucco inspection with your home inspection. Please do not hesitate to contact our office if you have any questions on what you might be looking at!
So many times during our inspections we run across "unique" designs or unusual designs that have worked for years at the home, but would not be allowed under current building standards. This type of situation is what makes our job difficult at times! We need to identify improperly installed or built items at the home and make our client aware of the possible implications that might arise out of the item or items we are identifying. But, we also know that this item has functioned for a long period of time and most likely will never cause an issue, but we really cant say that in so many words! Often, as experienced inspectors we also know that the owner will most likely not do anything about the issue! 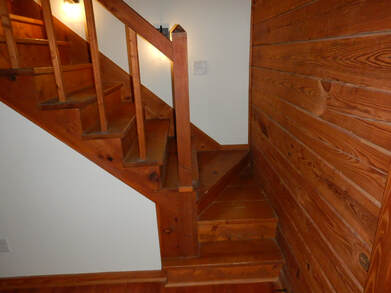 This is one such find on a 25 year old log home! the stairs to the second floor bedroom, bathroom and loft end at the exterior wall! It is impossible to extend that wall and it is impossible to rebuild the stairs! The owners that built the home, learned to live with this "unique" design and believe it or not the new buyers did not even notice it until I pointed it out! This home was built in a rural setting with no code inspections. 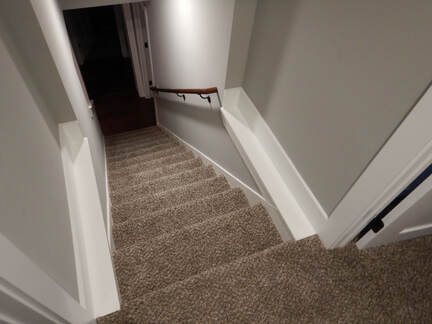 Here we have a set of stairs and the builder could not figure out a way to make the handrail go all the way to the top at the landing! So, you have about four steps that do not have a handrail.... This is really a dangerous design that can be corrected, it will just take some thought and a little talent to correct it. This house was only two years old and it had passed the local city inspections! If the owners had only had a home inspection prior to buying the home from the builder this would have been caught. Now they are being forced to correct it at their own expense So if you are looking at a new home be sure to take those "blinders" off and really look at that home! Ask yourself if you will be OK with the design of the home and any of those "unique" items in it. Most of all be sure you get an inspection of you new home regardless if it is new construction or of it is 100 years old!
|
AuthorScott Patterson has been a professional home inspector since 1995. Scott works out of the Greater Nashville TN area. Contact his team at Trace Inspections for all of your inspection needs. 
Archives
September 2023
|

 RSS Feed